Go to...  | Start A New Topic  | Search  | Notify  | Tools  | Reply To This Topic  |  |
 10/10 10/10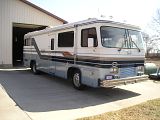 |
Shown are several photos of my headlight switch meltdown. I have no idea when this happened. Although thinking back abit (like when I bought the Barth) the switch has always been a little tempermental. Sometimes a little side to side movement of the switch made everything better. The thought was always in the back of my mind to replace the switch. I just wanted it to be on my terms. The straw that broke the camels back this time was you had the hold side pressure on the switch to keep the headlights on. Anyway it appears I will have to cut the wires and find both a switch and a connector with lugs. My switch doesn't have a part number or manufacturer's name on it so I'm hoping it is the same one Bill NY listed in a previous post. Also, Jack posted a Motorcraft part number for the switch. Either way I hope it's one of them. btw: Many thanks to Bill NY for including in the afore mentioned post, how to get the damn switch out. I was just about to the get pissed when I thought of searching the barth site for help. Thanks Bill NY, I didn't even see the spring loaded button until I went looking for it. If anyone has an electrical drawing that shows the headlight switch for a 1993 Regency with a MM chassis I'd be forever grateful if I could get a copy. I contacted Sparta back when I bought the coach and they emailed me the chassis drawings for my model chassis but it doesn't have the headlight switch on it. And it's only kind of accurate anyway. roman 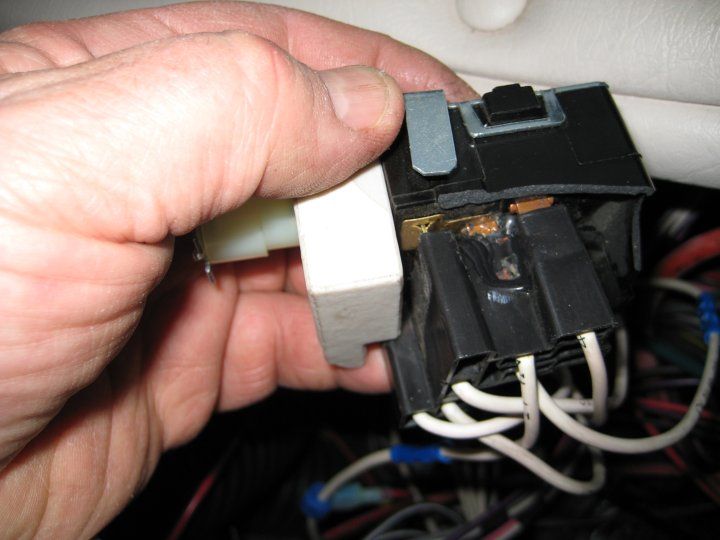 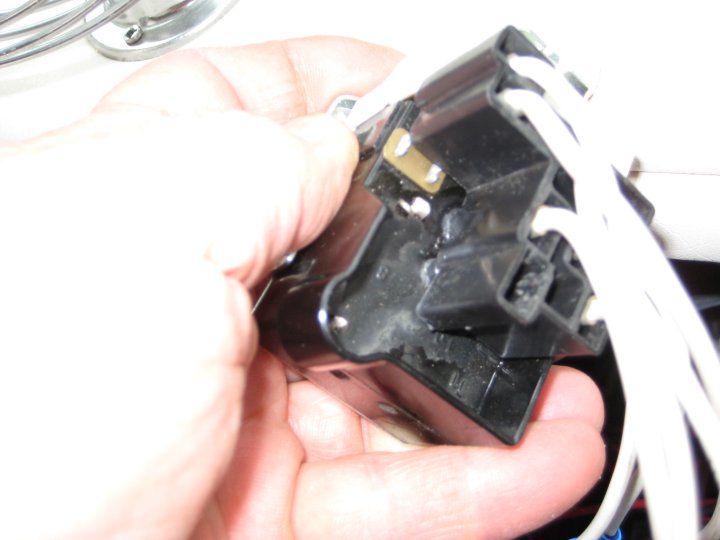 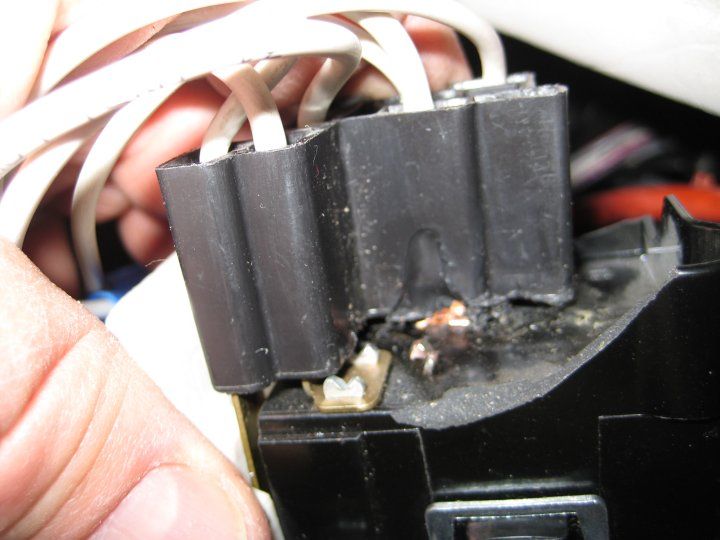 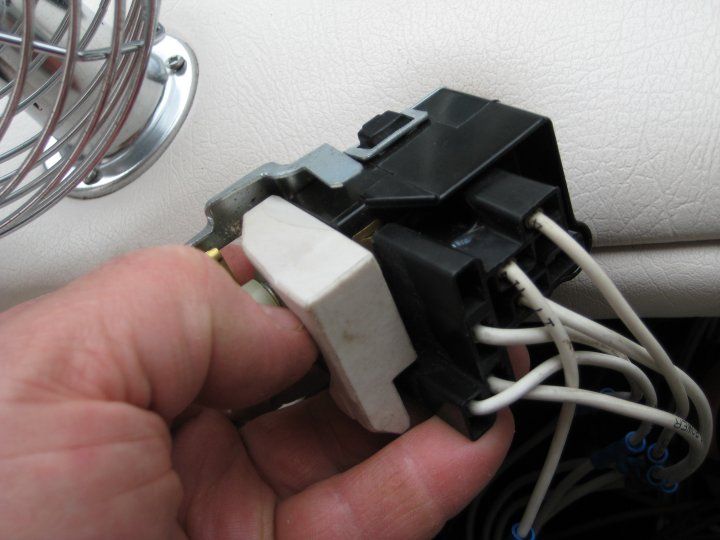 1993, 34', Regency, Widebody 300 HP Cummins 6 spd Allison, Spartan Chassis | ||
|
 |
Those pictures are scarey! It seems that a fuse, circuit braker or link would have blown before it got hot enough to melt down. You are a fortunate man to not have had this be a MUCH bigger problem. Good luck. W4JDZ | |||
|
"Host" of Barthmobile.com 1/19 1/19 |
Here is the one for an 86 Ford. It is the same part number that Jack left too. His was a FORD Brand Part# and Mine was a Standard Brand Part# - Same Item. It does not look like the one you have Roman. The wires and plug look all wrong. 1986 Ford - ECH HL6639 - Recommended heavier duty version from NAPA. This is the one that fits my 1991 & Jack's 1989 Regal. 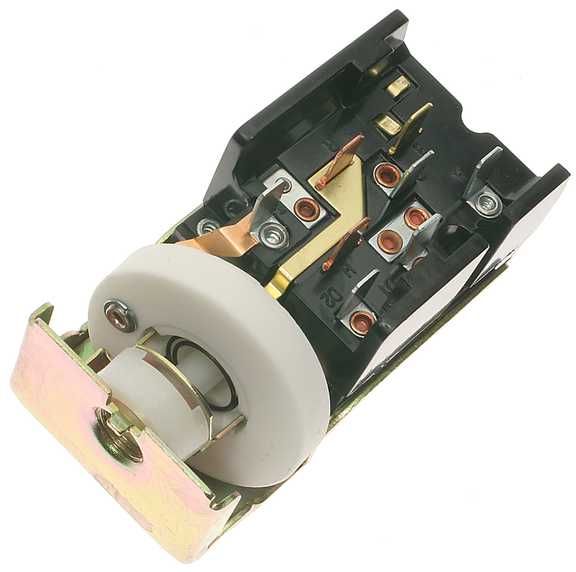 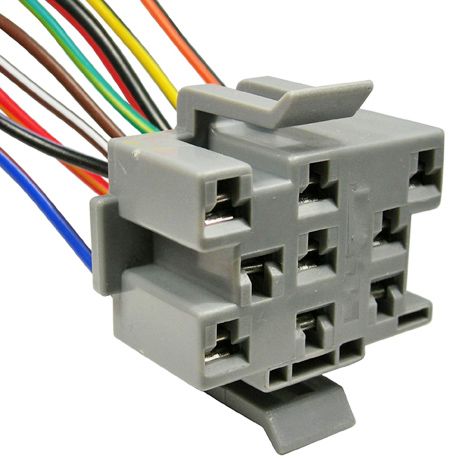 Here is the other thread that Roman was talking about. I'm going to add this image to that post in case someone stumbles onto that one first looking for the same info that Roman was looking for. 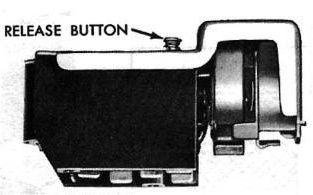 Headlight Switch Removal - Turn on the headlights by pulling the light switch knob out. Push the release button in and then pull the entire knob and shaft off - you might have to wiggle it in and out a little, but it will come off.
| |||||||||||||||
| ||||||||||||||||
Captain Doom |
Now would be a good time to consider installing relays. Rusty '94 28' Breakaway: MilSpec AMG 6.5L TD 230HP Nelson and Chester, not-spoiled Golden Retrievers Sometimes I think we're alone in the universe, and sometimes I think we're not. In either case the idea is quite staggering. - Arthur C. Clarke It was a woman who drove me to drink, and I've been searching thirty years to find her and thank her - W. C. Fields | |||
|
 7/17 7/17 |
Sure looks like a G.M. head light switch. I think you will find the contacts inside the switch are burnt. I think this is the start of the failure causing termanals to heat up melting the connector. Follow Rusty advice. It time for relays, both head-lights and tail-light. Lots of Amp draw with tail, clearance, and add to that trailer lights. 1986 31' Regal -1976 Class C 454/T400 P30 -350/T400 G30 twin cntr beds - 21' rear bath | |||
|
 1/11 1/11 |
dont know why but when we bought the coach we had two spares they are chevy switches. .lenny lenny and judy 32', Regency, Cummins 8.3L, Spartan Chassis, 1992 Tag# 9112 0158 32RS 1B | |||
|
"Host" of Barthmobile.com 1/19 1/19 |
Bingo... that's what they are. GM/Chevy Headlight Switches. NAPA Part# ECH HL6613 Headlight Switch is the Heavier Duty Version NAPA Part# MPE HL6613SB is the lighter Duty Version & it's half the cost. Stay away - 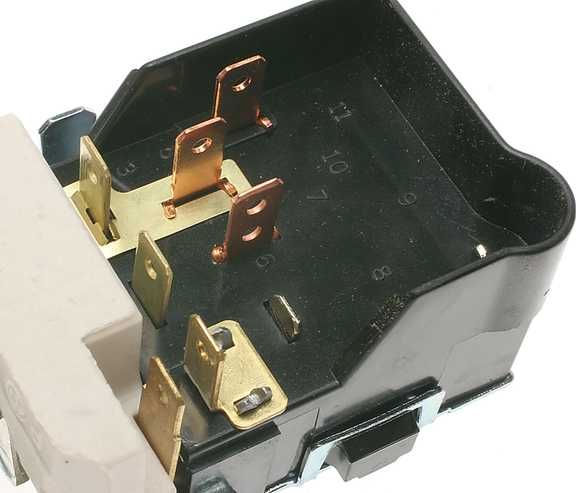 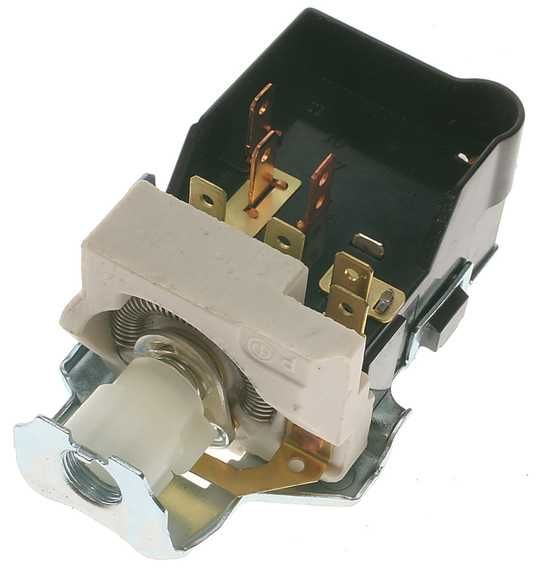 NAPA Part# ECH EC20 Wiring Harness  The ECH brand is Echlin Ignition The MPE brand is Mileage Plus Electrical My 2¢... The MPE designates their cheaper brand. It will probably not have brass contacts, chances are good that it'll have aluminum contacts instead. In 2009 NAPA changed the supplier of their "Value Line" to an undisclosed supplier. The MPE line is from an unknown source (China/Mexico) that doesn't produce their own "picture book" So, Napa just uses the pictures supplied by Standard. The Parts that are supplied by Standard are made in the USA or Canada, it will have brass contacts and are placed inside the Echlin box. The ECH Line are the higher quality/premium parts and are worth spending the extra money for anything you plan to keep around.
| |||||||||||||||
| ||||||||||||||||
| First Month Member |
Bill's warning on NAPA parts goes beyond switches or electrical parts in general. I have been snake-bit by their cheaper axle bearing and their cheaper fan belt before I learned to do my own research or deal with only knowledgeable countermen. There are secret codes that only a chosen few understand and will share. . 84 30T PeeThirty-Something, 502 powered | |||
|
"Host" of Barthmobile.com 1/19 1/19 |
Looking at another angle and comparing the 2 wiring harnesses, I make the following observation. 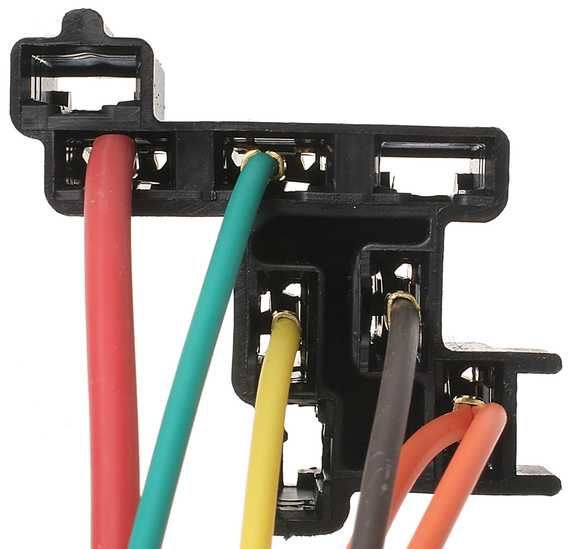 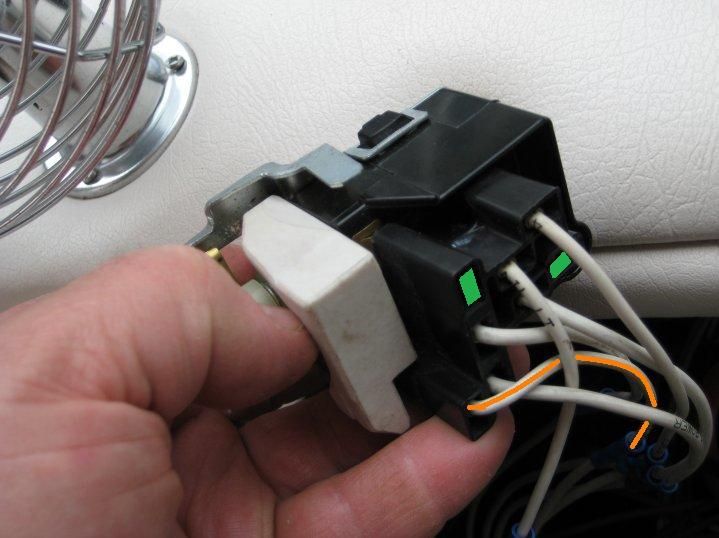 There is one missing wire in this newer harness. You'll need to remove the lower right wire from the old harness that I highlighted in orange and stick it into the new harness plug. The other 2 missing terminals/sockets are not on the melted plug too.
| |||||||||||||||
| ||||||||||||||||
 10/10 10/10 |
Thanks for all the input. The only light switch available locally was a NAPA HL6663 and the mating connector NAPA EC6. The switch looks identical to the HL6639 posted by Bill NY. The parts guy at NAPA appeared to be quite knowlegable of the parts game. Since he didn't have the HL6639 he searched for headlight switches for motorhomes and heavy duty vans on ford chassis, early 90's vintage and found the HL6663 and the connector. Total cost $34.88 and that was without my meager discount. I was so tickled he actually had a switch that I forgot to ask for the discount. It clearly isn't even close to the switch that came out and I didn't think to research Chevy switches. Obviously I hadn't checked the Barth site or I would have known to search for a chevy switch. But I figured I could probably make it work, after all I've been doing this type of work for many years. The first order of business was to map the old switch the best I could considering it was pretty well smoked. Then map the new switch which turned out to be more of a challenge because of internal connections and more terminals, so I created a matrix of the contacts. Then I went searching for the smoking gun that caused the first switch to melt down. I certainly didn't want to put in a new switch and have the same thing happen. Especially since I just replaced my chassis batteries because they were dead. After the better part of a long day searching I didn't find any problems. So I connected the switch and tested it 6 ways from sunday. The voltages looked good and there didn't appear to be any heat developing. I have a Fluke 0-20 amp DC clamp-on amp meter at the hangar so will check current tomorrow when I take the coach back. The new switch is physically larger than what came out so it took a bit of fiddling to get it in so it didn't interfere with anything else. Also, the panel nut had a slightly different thread so it took more effort than normal to secure the switch body to the instrument panel. Almost forgot, I left one of the old wires off the new switch. It was the one that Bill NY identified with his yellow pencil. The wire was labeled (DOME LT GND). I couldn't figure why it was there and what it was supposed to do, there isn't a dome light to my knowledge. Anyway I identified it for future use if needed. I also removed the unused new wires to lessen the clutter behind the instrument panel. Attached are photos of the new switch. 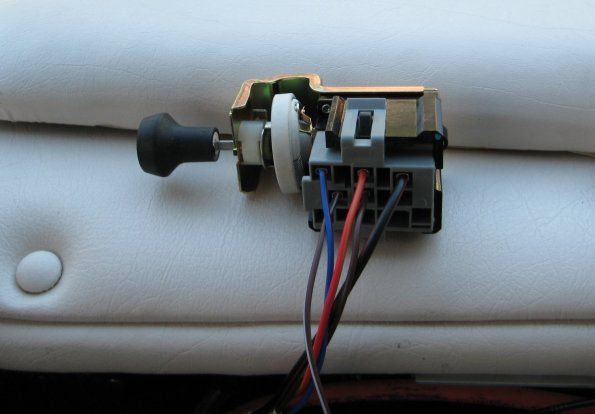 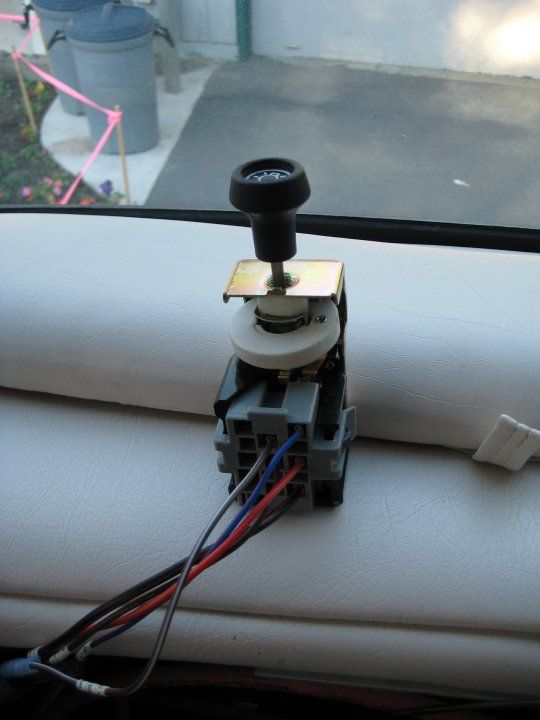 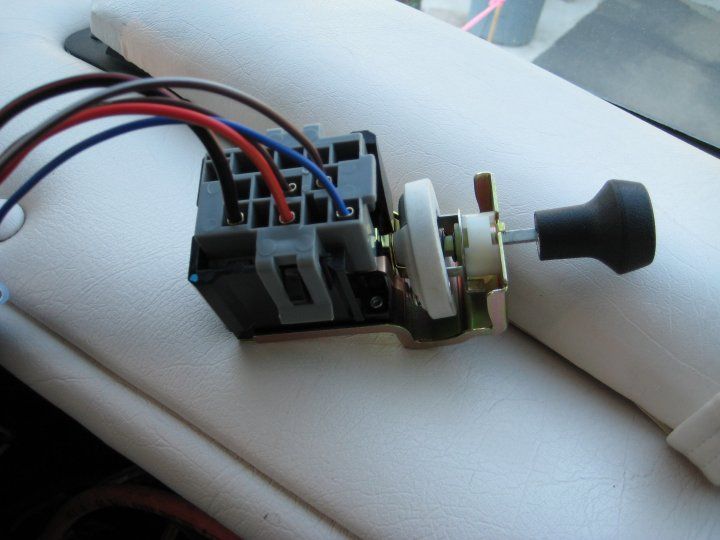 1993, 34', Regency, Widebody 300 HP Cummins 6 spd Allison, Spartan Chassis | |||
|
"Host" of Barthmobile.com 1/19 1/19 |
Could you share the wire coding for future reference? My headlight switch also had the wire connector for the dome light too. Same deal as you, it doesn't control anything. Mine was burnt, melted and hot to the touch, though not as bad as your was... My smoking gun was the normal varnish the builds up on an electrical connection that is old. Once I cleaned it up with a little wire brush, and then crimped it tighter, it wasn't hot anymore. You might want to clean up each headlight connection, at the headlight plug, and also the High/Low Beam switch in the same fashion mentioned... those two items are notorious for the same type of corrosion. True story... The reason I got my Barth so cheap (actually they were trying to pay me to take it from them) was the 2 piece electrical bulkhead connector, behind the dash was varnished up at the main power feed connection. This is what caused the unit to break down each time it went out. They towed it in EVERY TIME it went out for a medical round in the inner city. They couldn't trust it anymore, so they parked it. I found the problem, fixed it, and got my Barth because others wouldn't take the time to diagnose it properly. 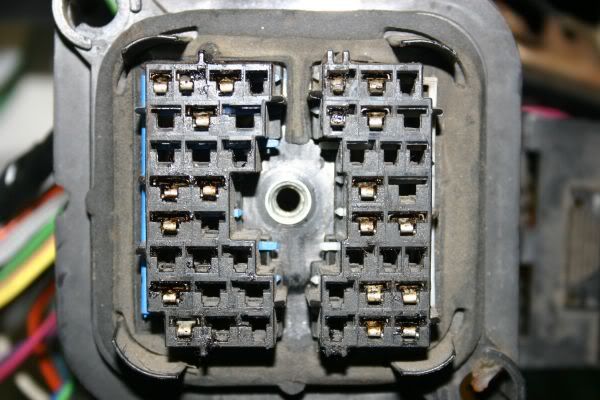
| |||||||||||||||
| ||||||||||||||||
 10/10 10/10 |
I'm not sure how clear these scans will come out but here goes. The switch map is pretty straight forward and much more informative than the matrix but I included the matrix anyway. I leave tomorrow for a vacation from my vacation, if that makes any sense at all. I will try to provide a better drawing of the switch map once I get gone! Roman 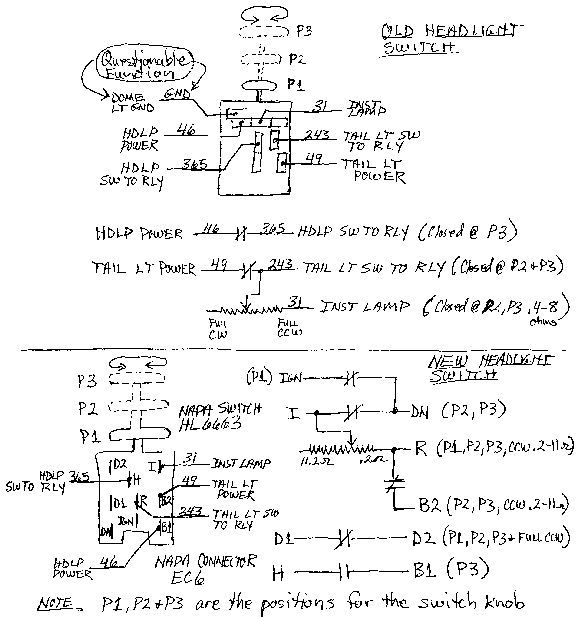 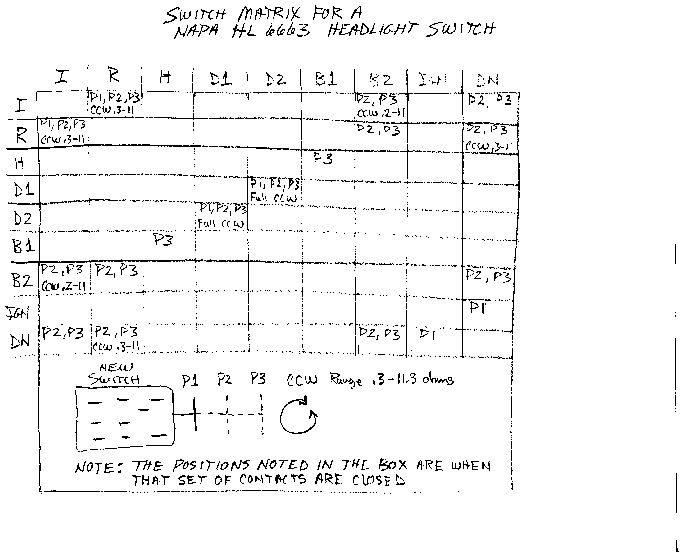 1993, 34', Regency, Widebody 300 HP Cummins 6 spd Allison, Spartan Chassis | |||
|
 10/10 10/10 |
Just noticed an error. The map of the new switch shows the contact between H and B1 to be open at position P3. The contact should show closed At P3. Roman 1993, 34', Regency, Widebody 300 HP Cummins 6 spd Allison, Spartan Chassis | |||
|
| Powered by Social Strata |
| Please Wait. Your request is being processed... |
|
This website is dedicated to the Barth Custom Coach, their owners and those who admire this American made, quality crafted, motor coach.
We are committed to the history, preservation and restoration of the Barth Custom Coach.
We are committed to the history, preservation and restoration of the Barth Custom Coach.


