Go to...  | Start A New Topic  | Search  | Notify  | Tools  | Reply To This Topic  |  |
 6/12 6/12Formally known as "Humbojb"  |
Does anyone have a picture of the 6 hole plastic valve receiver(lack of better words) that is supposedly on top of our gas fuel tank? Or better yet, a picture of the top of the gas tank. I am going to drop the tank enough to see the top, replace the filler hose(have to drill out rivets & replace) Is there a way to temporarily reroute hoses at the 6 hole valve so we can continue to use the rear gas tank while working on front tank? Are there any suggestions other than don't break the 6 hole valve thingy because it is not replaceable? I am going to remove two bolts on brackets on one side of tank, lower tank at a slight angle for viewing & decide where to go from there. Jim's back is out of whack so I plan to do this work. Detailed suggestions welcome. Thanks, Tere Note: Post moved per suggestion from o/p. Also see this post and this post for additional information. ~ Bill N.Y. ~
| |||||||||||
|
"Host" of Barthmobile.com 1/19 1/19 |
Here is a picture of a fuel tank sending unit. It has 2 or 3 hoses that go to the fuel pump - it has a supply and a return. If it has a 3rd hose, that goes to a charcoal canister or the generator supply. 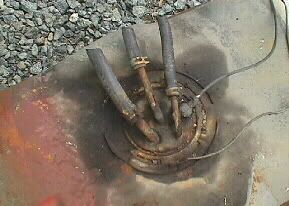 If you were to remove this style sending unit, you would need a special tool. Myself? I use a large screwdriver and hammer as my special tool... Some have a 6 bolt cover. That requires a 5/16 or 3/8 socket. 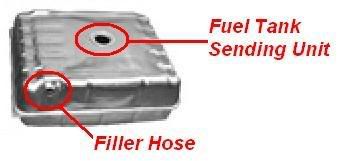 Here is a picture of the fuel tank found in most P-32 GM Vehicles from 81-86. The Filler Neck is attached with a hose clamp to the area I have circled in red and labeled "Filler Hose". You should loosen the filler neck at the fuel tank door before attempting to loosen the tank straps. The fuel lines, seen in the first photo, should be replaced too when you drop this tank. When replacing the fuel lines, the use of a constant torque clamp for fuel injection hoses is recommended. These clamps have an inner lining to protect the hose. The old clamps, seen in the top photo, come off with a pair of pliers and are a "Squeeze Type" constant torque clamp. If you noticed, the 3 fuel lines are cut, that is to keep the metal tubes from bending/cracking when you drop the tank. The metal tubes are fragile in a 23 year old coach and might cause you additional problems if you kink/bend them. If you break the sraps, don't sweat it, this happens very easily. They make replacement straps and they can be found on the page that I linked to earlier.
| |||||||||||||||
| ||||||||||||||||
Glassnose Aficionado |
Bill, how about a word regarding the proper clamps for the fuel lines, especially when they are in a place where you can't get at them to retighten them. 79 Barth Classic | |||
|
"Host" of Barthmobile.com 1/19 1/19 |
Go ahead Danny, tell us your technique. Besides what I already typed? I install the hose on the tank and then bolt up the straps. This gives me better access. Is this what you mean?
| |||||||||||||||
| ||||||||||||||||
 6/12 6/12Formally known as "Humbojb"  |
When you say loosen the filler neck at the fuel tank door is that at the place where you put the gas in the tank? In other words drill out rivets before undoing straps!? Also the two bolts that hold the straps nearest the center of the coach will come off easily, however the posts of the bolts that are closest to the outside of the coach are so damaged a bolt will not unscrew from there. So if I break straps i still won't be able to undo those bolts without breaking them. These straps on the outside of coach are attached to a bracket that has the damaged 4" posts that are part of a bracket that is welded to coach. I don't think I can reach hoses without lowering tank a little before cutting because there is no clearance between bottom of coach & top of tank. Maybe 2" max. Any suggestions?
| ||||||||||||
|
Glassnose Aficionado |
What I meant was using a constant- torque clamp as opposed to a simple screw-type. I learned here that the screw-type will no longer be tight when the hose ages and shrinks. The ones shown in your pic are the constant torque type that you put on with plyers rather than a screwdriver. There are better ones available, but I don't know enough about them to say much. How about some of you guys with more expeience? 79 Barth Classic | |||
|
"Host" of Barthmobile.com 1/19 1/19 |
Yes, if you have rivets around the filler neck tube, then these would be drilled out. When you remove the tank, you do not want anything holding it from dropping down. In my coach, I have 3 of these bolts holding the filler tube to a mounting bracket. These rivets are not the rivets that are around the door, are they? Could you please take some pictures? You know the saying... A lot less typing then a 1000 words. When your coach was built, the fuel tank was mounted to the chassis and then they built the coach around it. I will reserve comment until I see some photos. Send them to bill_ny
| |||||||||||||||
| ||||||||||||||||
 6/12 6/12Formally known as "Humbojb"  |
I've misplaced my camera & will take pics & send. I have several issues. 1) I cannot unscrew the nuts from the bracket holding the tank strap on the curbside. Too corroded. will probably have to break or cut to remove that side if I need to. Hoping that I can just remove the two nuts holding straps on inside of coach, bend them down enough to see what I'm looking at on top of tank, then go from there. 2) The filler hose & vent hose had a clamp holding them on, once I removed the clamps, the hoses are so stiff, that I can't wiggle them off. My only option I think, is to drill out rivets at filler door & hope I can push down on filler hose as I remove tank. My other option is to split the hoses at the tank with a razor & remove that way. Then I will have to find replacement hoses. Where should I look for these? Mainly filler hose, vent hose is pretty standard. 3)The area above the tank where the filler hose & vent hose go up to the filler door is impossible to get to without removing tank. There is some sort of foam or caulk starting at the floor of coach going up into the area where the hoses go up to the coach. 4)There is a 6 hole fuel selector that the rear tank,front tank are connected to using two hoses for front, two hoses for rear & then there are two hoses that go up toward the engine (front) of coach. I removed the two hoses that go to the front tank(the one I'm trying to remove)One was disintegrated. 4)There is a wire that goes to top of tank as well, it goes toward the engine too. I will have to cut & splice if I can't get to it once I lower tank & see if I can just disconnect it from where ever it goes on top of tank. 5)There is a ground wire that is on the curb side of tank attached to chassis, I was trying to trace it's location by following with my hand & it (broke) off so I have to find out what it is attached to now. Will send pics soon, I hope. Tere
| ||||||||||||
|
Captain Doom |
2) NAPA has filler hose. Rusty '94 28' Breakaway: MilSpec AMG 6.5L TD 230HP Nelson and Chester, not-spoiled Golden Retrievers Sometimes I think we're alone in the universe, and sometimes I think we're not. In either case the idea is quite staggering. - Arthur C. Clarke It was a woman who drove me to drink, and I've been searching thirty years to find her and thank her - W. C. Fields | |||
|
 6/12 6/12Formally known as "Humbojb"  |
Eureka!! I successfully removed the two bolts holding one side of gas tank. I had to grind them out. My first time with the grinding wheel. Sparks everywhere. I was a bit unnerved but someone told me to hang wet towels around the area to prevent fire. It worked. I replaced with new bolts. I will now be able to slice off the filler hose & vent hose, there is a wire I may have to cut but I'm hoping I can lower the tank enough that I can get at it to unplug it from what ever it is hooked up to. There are two hoses going from the 6 hole selector thingy to the top of the tank, I will probably cut these so they don't damage what they are hooked to on top of tank. Then down she comes. Any more suggestions before I go forward. Tere
| ||||||||||||
|
 6/12 6/12Formally known as "Humbojb"  |
Rusty, Thanks for the tip about filler hose @ NAPA. Tere
| ||||||||||||
|
 6/12 6/12Formally known as "Humbojb"  |
Tere has been able to get the gas tank on the ground, but now has to raise the coach about 1" to be able to move it out from underneath the Barth. I have a 3 1/2 ton floor jack, and another bottle jack. Question is, since this tank is located about the middle of the coach, where would a good jacking point be? Don't want to twist the frame or something. What about right near the right front shock absorber, on the frame rail? Front axle weight rating is about 5000# so I think that there's about no more than 3000# on the right front tire. Would appreciate advice.
| ||||||||||||
|
| First Month Member |
I raise my whole front end (on a level surface) by using the center of the front suspension crossmember as a jack point, and then supporting it with jack stands or cribbing. If you only need an inch or so, placing the jack cup under the rounded hump on the underside of the lower A frame is good. This keeps the other front wheel on the ground to resist any sideways movement. Again, use a jack stand or cribbing. This is a little ex post facto, but I like to run mine up on ramps before going underneath. Easier and safer. . 84 30T PeeThirty-Something, 502 powered | |||
|
 6/12 6/12Formally known as "Humbojb"  |
We were able to raise the motor home 1"/2" with a floor jack near the front lower a-arm, and the tank is now out. Surprise--it was not installed by Barth. It was made by Aluminum Fabricated Products in Perry, Fl, Sept '94. They are now called RDS Manufacturing. On the top of the tank are the filler neck and next to it what I guess is the overflow pipe. There are two outlet/inlets, one for fuel going to the engine and one for fuel coming back from the engine. There is also a small plastic fitting on top for a 1/4" vent line. The hose that was in bad shape was the 5/16" return line. My guess is that when the tank was full, gas would seep out of that line and drip on the ground and stink up the inside of the Barth. Tere did a great job of getting it out and is now cleaning it. There is also the prerequisite sending unit which we probably won't disturb. There is no evidence of a 'sock' and the fuel we poured out was very clean, just old. Will give up dates as we get new hoses, straps, rubber covers for straps etc. I will be calling RDS to find out why there is a pressure cap on it. The GM tank in the rear does not use a pressure cap.
| ||||||||||||
|
Captain Doom |
I had RDS do my genset gaso tank to spec - they do very good work. I had mine vented. Four openings/fittings: Fill Supply Vent Sender Rusty '94 28' Breakaway: MilSpec AMG 6.5L TD 230HP Nelson and Chester, not-spoiled Golden Retrievers Sometimes I think we're alone in the universe, and sometimes I think we're not. In either case the idea is quite staggering. - Arthur C. Clarke It was a woman who drove me to drink, and I've been searching thirty years to find her and thank her - W. C. Fields | |||
|
| Powered by Social Strata | Page 1 2 3 |
| Please Wait. Your request is being processed... |
|
This website is dedicated to the Barth Custom Coach, their owners and those who admire this American made, quality crafted, motor coach.
We are committed to the history, preservation and restoration of the Barth Custom Coach.
We are committed to the history, preservation and restoration of the Barth Custom Coach.

