Go to...  | Start A New Topic  | Search  | Notify  | Tools  | Reply To This Topic  |  |
"Host" of Barthmobile.com 1/19 1/19 |
I decided to replace the door skins for the compartment/storage area and I thought that this would be "An Easy Job" Anyway, after I removed one of my doors, I thought I would post my progress and to seek advice at the same time. You know, whenever you do any type of job on a motor home someone is bound to say "You should have done..." or "I would have used..." and the good old "Why did you use _____? You should have used _____ instead..." To bring everyone up to speed, I have done the following... 1) Drilled the rivets out of the hinge and left the hinge attached to the Barth. 2) Drilled all of the rivets out of the door frame and removed the handle. 3) Ground down 2 of the 4 corner welds and used a wide spatula to removed one of the 4 pieces of aluminum channel. 4) Used a wide spatula and a hammer and broke the caulk/sealer between the aluminum channels and pulled the entire inner piece out of the remainder of the door frame. After I got to this stage I was figuring on getting a piece of aluminum panel and replace the outer skin. This is when I ran into a little second guessing. -Inner panel -2 pieces of luan -Foam insert -Outer door skin. This looks very familiar... While inspecting the pieces, I came to the quick realization that the panel that I was holding was nothing more than a "rear swing door" from a refrigerated tractor trailer. I called my local trailer shop and asked about the different doors that they had in stock. I ordered up a rear swing cargo door and had it delivered today. Sure enough, it's the same stuff. Tomorrow I plan on cutting up the door blank and inserting it into the channel. I'll then weld the channel back together again and then use some caulk to seal the aluminum channels to the inner and outer door skins. I'll take pictures of the progress and post them when completed. So far I've only started stripping one of the 6 doors. I'll be doing all of them so any suggestions, shortcuts and tips will be tried on the others... What would you use to seal the door frame to the door insert? What would you do differently? | ||
|
| The Old Man and No Barth |
Bill, you did pretty much what I did, but I lacked the knowledge to look for prefabbed material for the door. I rebuilt mine with new luan, & foil-faced foam insulation. Couldn't find any heavy gauge aluminum out here in the boondocks, so I used aluminum flashing for the exterior. I know it won't stand up to hard knocks like the heavier stuff, but it was what was available. Your way is easier, & good guidance for others who might wish to do the job. No welding for me either. I reinforced the corners with a fabricated angle bracket riveted in, & filled the gaps with Marine-tex. Not original, but close enough for gummint work. | |||
|
| First Month Member |
Bill, if I did what you are doing, where would I go and what exactly would I ask for? . 84 30T PeeThirty-Something, 502 powered | |||
|
"Host" of Barthmobile.com 1/19 1/19 |
Try this link to start your search. NTTS Breakdown Service Go to the left side and put in California The little box is for the city - type in El S, and you'll get El Segundo to pop up. Use the Trailer Repair Shop tab for good hits. A quick search using that for criteria yeilded many good hits. When you call, them tell them your looking for an insulated trailer door blank. Explain to them what you want it for. I got a new trailer door blank that was 10' x 4' Trailer door blanks are industry standard types. Any mfg will fit. They come in 1/2 and 3/4 thickness. No one really uses the 1/2. Just make sure you ask for 3/4. Insulted and non insulated are options. I used a door blank for a Great Dane trailer. GDT GD3/4x4x10W/A Plymetal Panel.75x49x121 WH My cost for this was $100.00 You could also ask for a sheet from a damaged door. The pieces that we use are so small that even a damaged rear trailer door has a lot of good pieces you can cut off. I really didn't see the need for an insulated door. When the delivery guy came from Northeast Great Dane I looked at both and then opted to take the Non-Insulated door blank. It saved me some money and none of my boxes are heated or insulated to begin with. And maybe it was time to try something new... I have noticed that the insulated doors on many trailers have that same type of bubbling of the skin. Maybe it has to do with the insulation trapping the moisture in?
| |||||||||||||||
| ||||||||||||||||
| The Old Man and No Barth |
One man's opinion re: the bubbling. When I dismantled mine, the luan was saturated with water. The doors are penetrated by unsealed rivets that allow water to seep in & collect, no matter how well the rest of the structure is caulked. The iron content of the water, or perhaps the iron in the luan leaches out to create a galvanic reaction with the aluminum to generate corrosion. When I redid mine, I sealed all the edges of the replacement panel to slow the penetration of water. I still have one door with corrosion, but the rest are clean. | |||
|
| First Month Member |
I have drilled several holes up into the bottom edge of each door to be sure no water accumulates. . 84 30T PeeThirty-Something, 502 powered | |||
|
You might use siflka (spelling wrong) which is a sealant glue the bus manufactures use to glue aluminum skin to steel ribs. Lots of discussions at busconversions.com and busnut.com '92 Barth Breakaway - 30' 5.9 Cummins (6B) 300+ HP 2000 Allison Front entrance | ||||
|
| First Month Member |
Bill, I started a new thread on adhesives and sealants to avoid the dreaded thread drift. . 84 30T PeeThirty-Something, 502 powered | |||
|
"Host" of Barthmobile.com 1/19 1/19 |
Today started out great. I got up and started to work on the doors. I cut up several pieces of the new door and installed the channels. The original thought was to install this as a U shaped. I left 3 channels on and tried to tap the door blank in. Will not work. Broke the welds on the first piece I tried. I wound up removing each weld and worked on 1 panel at a time. The job took several hours but the time seemed to fly. Before I knew it I had 90% of the job done. 2 road calls kept the job from being completed today. Tomorrow I will clean up the dirt and grime. Wash the panels and touch up the paint around the door frames. After I install the door locks I'll take some more pictures. Below is a picture of the Barth, minus the doors. 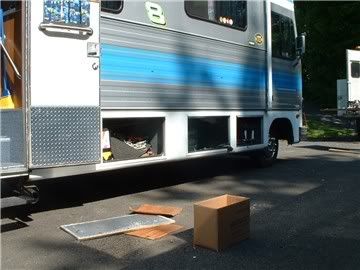 | |||
|
"Host" of Barthmobile.com 1/19 1/19 |
In this picture you see the door blank. Not much of a picture - just a feel for getting started. 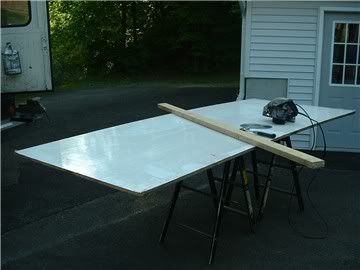
| |||||||||||||||
| ||||||||||||||||
"Host" of Barthmobile.com 1/19 1/19 |
This is a cut up door blank getting fitted for the channels. Some channels are already installed. I left the clear plastic sheet on the outside to keep from scratching the new panels. 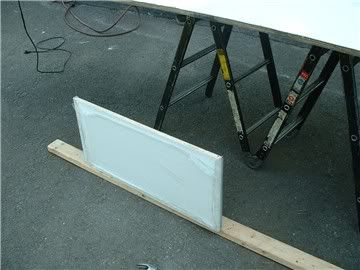
| |||||||||||||||
| ||||||||||||||||
"Host" of Barthmobile.com 1/19 1/19 |
Another view of channels being installed. If you see a number 3, that stands for the clock position. 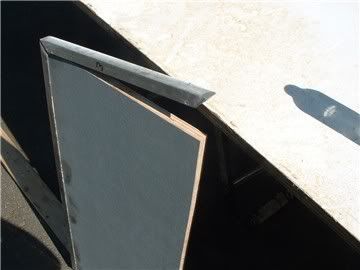
| |||||||||||||||
| ||||||||||||||||
"Host" of Barthmobile.com 1/19 1/19 |
Ready, set, weld. 2 panels ready to go. Inside view of the plastic coated door panel. 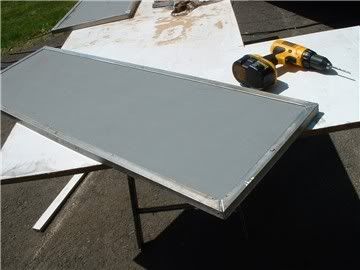 | |||
|
"Host" of Barthmobile.com 1/19 1/19 |
Door blank being cut down to size. When all is said and done, not much left over... 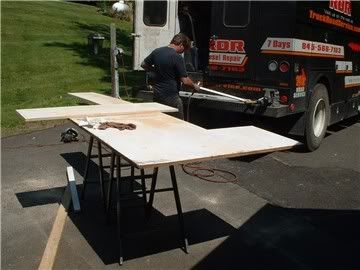
| |||||||||||||||
| ||||||||||||||||
"Host" of Barthmobile.com 1/19 1/19 |
Door panels installed - night time shot. Had to go and make money today so I wasn't able to finish it up. You'll see plastic sticking out around the seams. This is the clear plastic covering. Still need to drill the locks in. 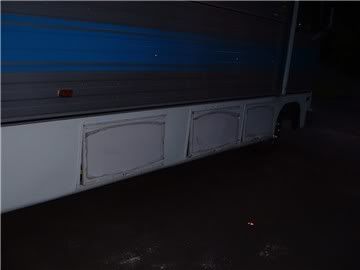
| |||||||||||||||
| ||||||||||||||||
| Powered by Social Strata | Page 1 2 3 |
| Please Wait. Your request is being processed... |
|
This website is dedicated to the Barth Custom Coach, their owners and those who admire this American made, quality crafted, motor coach.
We are committed to the history, preservation and restoration of the Barth Custom Coach.
We are committed to the history, preservation and restoration of the Barth Custom Coach.

