Go to...  | Start A New Topic  | Search  | Notify  | Tools  | Reply To This Topic  |  |
Captain Doom |
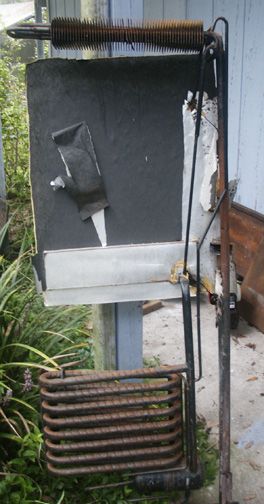
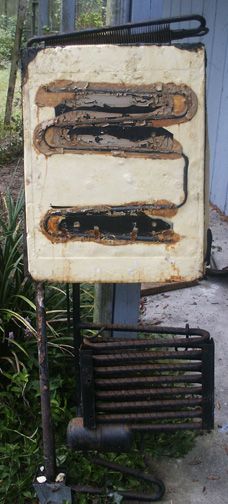
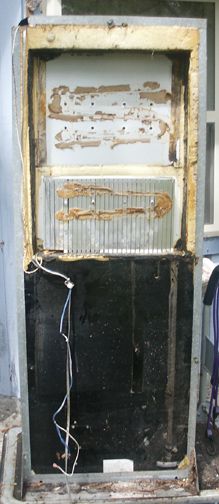
I couldn't find anything useful on the 'net about how these cooling units are attached. However, to fit the old reefer into my van, I had to take the cooling unit off, and took a couple of photos of what it looks like. The first photo is the back of the unit. It's held on by 8 bolts inside the freezer compartment and in the back, 3 #8 sheetmetal screws (5/16" hex head). Two of the screws are on each side of the large lower coil, about midway. The third is on a bracket at the top section of cooling fins. I removed the control board, ignitor board, and gas control for salvage, but readying the cooling unit for extraction is actually pretty simple: 1. Disconnect the following wires: a. 120VAC heating element from the control board (Two spade terminals). b. 2 blue and 1 white wires from the control board (Spade terminals) c. Flat 8-conductor (silver) from the control board (RJ connector) d. Ignitor wire from the ignitor board (Spade terminal) 2. Disconnect the gas burner at the solenoid valve. 3. Remove the three screws and 8 bolts mentioned above. (Optional - but recommended because the fins are fragile - remove the four bolts in the fins in the refrigerator section) 4. Because of the mastic applied, the cooling unit will need to be pried out. I removed the shroud and insulation around the heat riser (vertical tube on the far right) to make it easier, but this should be unnecessary. Place a block of wood (to get the crowbar where you can push and to protect the box) below the silver backing paper, and pry the unit from the box by applying pressure to the large tube (the one paired with the small tube that go into the box). Note: I cut the backing paper around the unit - this joint is quite easy to see - but this may not be necessary. This is the back of the cooling unit:  This is the "inside" of the cooling unit; the slopped-on brown material is the mastic:  This is the back of the reefer box; the refrigerator cooling fins are still in place:  Rusty '94 28' Breakaway: MilSpec AMG 6.5L TD 230HP Nelson and Chester, not-spoiled Golden Retrievers Sometimes I think we're alone in the universe, and sometimes I think we're not. In either case the idea is quite staggering. - Arthur C. Clarke It was a woman who drove me to drink, and I've been searching thirty years to find her and thank her - W. C. Fields | ||
|
| Powered by Social Strata |
| Please Wait. Your request is being processed... |
|
This website is dedicated to the Barth Custom Coach, their owners and those who admire this American made, quality crafted, motor coach.
We are committed to the history, preservation and restoration of the Barth Custom Coach.
We are committed to the history, preservation and restoration of the Barth Custom Coach.

