Go to...  | Start A New Topic  | Search  | Notify  | Tools  | Reply To This Topic  |  |
 |
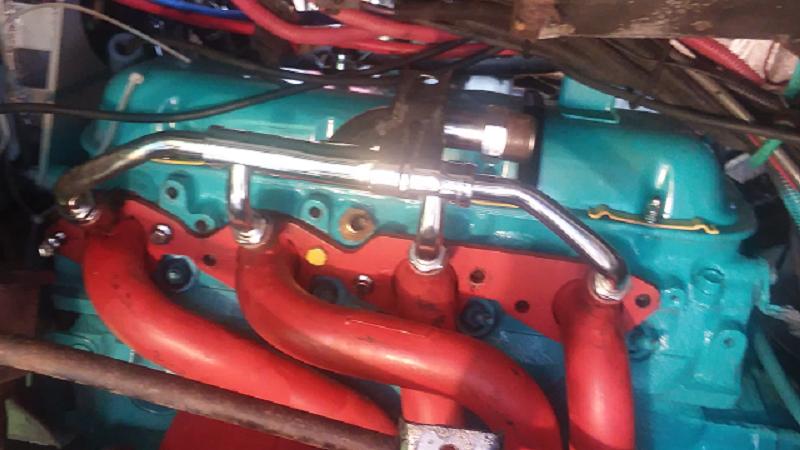
This was the scene. Some of the bolts were started, others would not go in. The header was positioned the stainless ARP bolts askew from where they should be. Your mileage may vary! Matt 1987 Barth 27' P32 Chassis Former State Police Command Post Chevrolet 454 Weiand Manifold, Crane Cam, Gibson Exhaust  | |||
|
 |
Here is another view of the engine, with the job nearing completion. Starting in the center, we see a "swap meet" air cleaner cover from a 400. I will need to get a 454 sticker. I used this cover, because the stock cover is a "double height" cover, and has interference issues with the dog house cover. This problem exists because the Edelbrock Street Warrior intake manifold is about 2 inches taller. I wire-wheeled the air cleaner base, primed, and painted it black. The snorkle tube now does not look like old rust. Now, on the right of the image, snorkel height is above where it used to be with the stock manifold. That would have interfered with the stock oil fill tube. So I got an NOS G20 oil fill tube from ebay, and cut it to size. It goes under the snorkel, the stock oil fill tube was intended to go over the snorkel and affix to the relay bracket at the top right. So by going under the snorkel, the "altitude change" for the oil fill was accomplished via a new Gates hose in the right diameter, roughly an S shape. I put the other portion of the G20 fill tube above the radiator support, and it gives me a better position to fill oil, instead of the stock position of the original tube. You can see some hoses there, in the vicinity of the new relay on the top right. There is the new alternator. Somewhere else I posted about that, and used a version with a fatter adjustment bolt. While I was at it with the oil fill tube, I also modified the position of the coolant fill port. The section of hose up there was an original GM installation, and is likely a source of trouble after 30 years. I moved the coolant fill position to better work with the position of the Barth "engine bay" door. Near the top, you can see a new diverter valve, and new AIR pump. I painted the aluminum case of the AIR pump with aluminum engine paint. Obsessive? Crazed? Please be polite. :-) I wanted to keep these stock emissions components. My "read" of the world suggests that at some point engines without stock emissions controls are going to have problems at inspection time. Between the AIR pump and the AC compressor, you can see where I mated two radiator hoses together, to deal with the geometries caused by having the thermostat housing mount different on my new intake manifold, as compared to the stock GM manifold. I wrote about that elsewhere, and needed an early '60s Nova part for the water neck. Next, on the left of the top, you can see the AC compressor. My newly installed AC compressor bracket mounts the compressor roughly an inch higher. I am hoping to have an easier time of removing the valve covers in case valve adjust adjustment is needed. I needed a longer belt too. I painted the fan blades white, hoping that if the new water pump ever starts weeping, I might be able to detect a rust stain more readily. Next, you can see the wide red "heater hose". This is coming from the diverter valve, and headed to the air cleaner, to vent the air being pumped under certain conditions. This red hose is used instead of the stock molded hose, because of the change in altitude with of the air cleaner, due to the taller manifold, and due to interference with the position of the radiator hose coming in to the thermostat housing. On the firewall, next to where the gas pedal is, you can't see them, but there are two electronics modules there. One was "hanging loose", and not affixed to the studs present. It took some time to figure this out, but the studs are threaded for 1/4-24. Try finding those nuts. I could have "tie wrapped" the module in place, but that would be SO WRONG. The aftermarket supplies 1/4-24 nuts, for used on 1950s Harley Panhead oil pumps. I got those on ebay also. On the valve covers, I had problems removing the old studs and nuts, due to rust. Those are replaced with stainless steel studs, with Allen head tops. Those are the normal 1/4-20 threads. I am using stainless lockwashers, stainless nuts, and stainless acorn nuts to better protect the tops of the studs. OK, maybe obsessive. Neversieze is used on these studs, going in to iron. Hidden in this view, is the new fuel inlet tube I bent to fit the taller manifold. I also bent a new tube to provide a vacuum source to the transmission. I am using GM Performance wire looms. I am finding that with my headers setup, the spark plug wires with a 135 degree boot are those that fit best. In years past, I put a Crane adjustable vacuum advance can on the distributor. What remains to be done? - check all vacuum lines - replace the vacuum line going from the engine to the vent controls - secure the purge canister - set the ignition timing correctly I think there should be an air filter on the hose going to the canister to which the hoses to the AIR pumps go to. I need to address that as well. Happy Motoring, Matt 1987 Barth 27' P32 Chassis Former State Police Command Post Chevrolet 454 Weiand Manifold, Crane Cam, Gibson Exhaust | |||
|
 |
I am going to declare "job done" on the project that started in November of 2020. The 454 sticker is on the air cleaner now. It says something about 425 HP, but who's really keeping track? Things that show up, that I would like to point out... - GM Performance wire looms are great. - the change in the manifold height required adaptations... * oil fill tube needed to be altered * breather hose from passenger side valve cover needed replacement * preformed hose for front AIR pump diverter valve would not fit, so a red heater hose is used * my interest in red heater hose caused me to add insulation around the positive cables going over the magnetic starter switch bracket The "break in" of the new camshaft was done without moving the Barth, so the added heat around the starter area cooked the solenoid. I added a new solenoid and also added a heat shield. I liked this project. I have more ideas of things I want to do. Happy motoring, Matt 1987 Barth 27' P32 Chassis Former State Police Command Post Chevrolet 454 Weiand Manifold, Crane Cam, Gibson Exhaust | |||
|
 |
How did it go, you ask? I made a 100 mile ride to New Hampshire. In my unbiased opinion, the engine runs cooler, smoother, quieter, and stronger than ever. There is no substitute for removing the valve covers a few times to get that valve lash right. There is no substitute for removing the exhaust header 4x until the right exhaust manifold gasket is found. 8 miles in to the trip, the engine sputtered and the tachometer was bouncing around wildly, for 2 or 3 seconds. I thought the HEI module might be failing. And it returned to normal, and continued running great. I noted a few situations where I slowly increase the throttle around 2200 rpm, and get a backfire through the carb. That's a lean condition, and if I hit the throttle harder in the same situation, the engine runs great. I assume that the accelerator pump on the quadrajet is the difference. I have some carburetor tuning to do. I can move the accelerator pump actuator rod to a different hole on the lever, and I should learn about that APT adjustable part throttle feature. My inspection showed that the throttle return spring was not set properly, and a spark plug wire was closer to the header than I would like. No leaks!!!! Happy Motoring! Matt  | |||
|
 3/22 3/22 |
Glad you are on the road! Dana & Lynn 1997 38ft Monarch front entry Spartan Mountain Master Chassis Cummins 8.3 325hp Allison MD-3060 6 speed 22.5 11R Cummins Factory Exhaust Brake 8000 watt Quiet Diesel Generator 9608-M0022-38MI-4C Christened Midnight 1972 22ft 72081169MC22C Christened Camp Barth | |||
|
 3/09 3/09 |
Nice Job and great commentary Matt! Makes me want to get back to working on Three times a charm Three Times A Charm 88 30' Regal John Deere Hot Rod Lincoln 511 Cubic Inches 8712-3499-30J-A | |||
|
| Powered by Social Strata | Page 1 2 3 |
| Please Wait. Your request is being processed... |
|
This website is dedicated to the Barth Custom Coach, their owners and those who admire this American made, quality crafted, motor coach.
We are committed to the history, preservation and restoration of the Barth Custom Coach.
We are committed to the history, preservation and restoration of the Barth Custom Coach.

