Go to...  | Start A New Topic  | Search  | Notify  | Tools  | Reply To This Topic  |  |
 |
I didn't use a stock replacement alternator. Nothing was wrong with my existing alternator, but with my hands being on it, I wanted to better restore the rig. I used the 334-2380 for a 1990-1997 GMC Chevy Kodiak Topkick Truck. It is basically the same alternator, but needs to be reclocked. That means the front and back halves are unbolted and the thing is turned one step, and rebolted. The reason for this, is that this alternator has the same case casting, but the hole for the adjustment bolt is bigger, and a fatter bolt is used. I hope that because a fatter bolt is used, that the alternator belt won't need to be given as much attention for readjustments. To support the fatter bolt, the slot in the mounting bracket had to be filed something like 0.25mm. My electrical problem: I turned the key, and nothing happened. I checked the battery connections, the battery cables, the starter... And when I am lying underneath, looking at the starter, it dawned on me! "The Starter Relay"! I bought a new one of those. So I looked at my starter relay and was puzzled, because the original one was still being used. And upon closer inspection, I found that one of the wires had broken. You can see my temporary wiring patch. I'll fix that and get the new relay in place. Happy Wiring! Matt 1987 Barth 27' P32 Chassis Former State Police Command Post Chevrolet 454 Weiand Manifold, Crane Cam, Gibson Exhaust | |||
|
 3/23 3/23 |
I always wondered why Chevy used a relay to run the starter relay on my P30 too, seems redundant. A wire broke on mine last year too!! Maybe to much current for the switch needed for the starter relay. 1971 24 ft Barth Continental P30 chassis 350 engine | |||
|
 |
I didn't want to try to start the engine for the first time, and risk having a backfire through the carburetor launch burning fuel droplets within my Barth. I borrowed a smaller air cleaner from "The IROC project" and used that to protect against risks of fire. It helped. There were some backfires through the carburetor as I tuned the distributor by ear. My next "re-engineering" activity is going to be having to do something about the interference between the air snout on the stock air cleaner, and the oil filler tube. Because this Weiand intake manifold is taller, it causes the air cleaner to be at a higher offset. Probably the right thing to do will be to cut the oil fill tube and add in a spacer hose. But I will need to ensure that there will still be a pitch to the tube so that oil will fill the engine from the front oil-fill position. Get your motor running! Matt 1987 Barth 27' P32 Chassis Former State Police Command Post Chevrolet 454 Weiand Manifold, Crane Cam, Gibson Exhaust | |||
|
 |
Duane88! There's a good explanation in Appendix 7-12 "HOT START PROBLEM CONDITIONS", in the P30 Chassis Manual. The manual instructs mechanics to install this relay if needed, and by the time our rigs went down the line, it was factory standard. That manual is great! I think Bill NY posted it years ago! Matt 1987 Barth 27' P32 Chassis Former State Police Command Post Chevrolet 454 Weiand Manifold, Crane Cam, Gibson Exhaust | |||
|
 3/23 3/23 |
Knowing your penchant for perfection probably not what you would do but,,, If you try to put oil in your engine from that front location, it is awful oil everywhere and takes about a week per quart. I eliminated it and plugged the valve cover. 1971 24 ft Barth Continental P30 chassis 350 engine | |||
|
 |
It sounds like a symphony to me!!!! I have lots of loose ends to deal with, but the engine is running and staying running and sounds great. On startup, I found I had a loose fuel fitting on the engine mounted fuel pump. All the scars on my hands will heal, and all the rust particles that I got in my eyes (even when wearing protection) washed out. https://www.youtube.com/watch?v=6Zgs0VFW6mY Matt 1987 Barth 27' P32 Chassis Former State Police Command Post Chevrolet 454 Weiand Manifold, Crane Cam, Gibson Exhaust | |||
|
 |
I want to report on the top radiator hose solution. When changing input manifolds, the stock thermostat housing can't be used. The stock manifold had the mounting bosses in an unusual fore/aft position, when "typical" manifolds go side to side. The stock hose needs to go over the AIR pump and then down. Because I wanted to keep the AIR pump, angles and geometries were challenging. I used segments of 3 hoses, and a thermostat housing from another era. The first hose is the stock Dayco 71429. The second hose is a segment from a Gates 20940 to provide a 120 degree bend in a 1.25" diamater (originally intended for a Pontiac Fiero). The third hose is a segment from a Gates 20797 to provide a 90 degree bend while also going from 1.25" to 1.5" (originally intended for a Mercedes 6 cylinder from around 1970). The thermostat housing is a TRW 26004 (intended for a Chevy straight 6 in the 1970s). The connectors are Summit 380600. If anyone vulcanizes their own hoses, I would be eager to learn of this. [edit - that's a mouthwash bottle cap on the hose connection point of the diverter valve, temporarily in place to keep dirt out.] Happy Motoring, Matt 1987 Barth 27' P32 Chassis Former State Police Command Post Chevrolet 454 Weiand Manifold, Crane Cam, Gibson Exhaust | |||
|
 3/23 3/23 |
Geez. love that clean painted engine!! Matt you would have a heart attack, I am in the process of removing AIR pumps, the carbon canister and associated junk in 88, been long gone in Nose!!! 1971 24 ft Barth Continental P30 chassis 350 engine | |||
|
 |
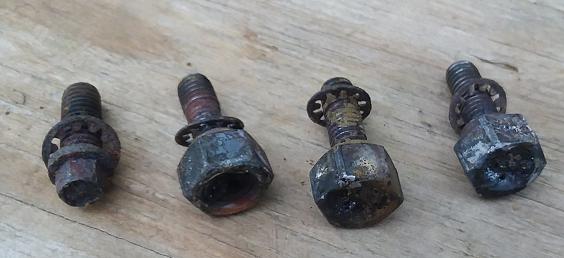
Winter project? It is summer now! Exhaust header bolts were a problem. I decided to remove the header because of the leaking AIR tube. A few bolt heads rounded. I could not remove the bolts! I removed the brake fluid reservoir from the master cylinder to gain access. The brake lines were not opened up, so I won't have to bleed the brakes. I saw videos of guys welding larger nuts on the heads of bolts, or on broken studs, to enable removal. I tried with my little Harbor Freight MIG welder, but it wasn't enough. I called a neighbor, a pro welder, with a diesel powered welder in the back of his truck. This is a "stick welder" , and he had to try 3 different types of stick, to find one that would adhere to both the nut and the bolt. Progress is being made! The picture shows a bolt I was able to remove, and 3 that needed a nut welded on. The welds could hold up to an impact driver. Matt 1987 Barth 27' P32 Chassis Former State Police Command Post Chevrolet 454 Weiand Manifold, Crane Cam, Gibson Exhaust  | |||
|
 |
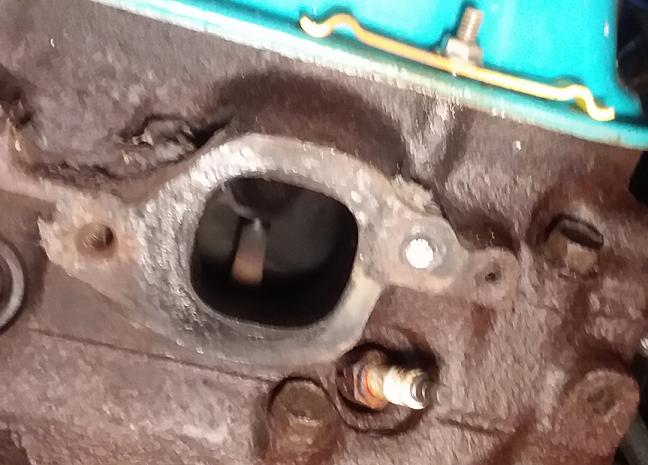
This picture shows the rear most exhaust port on the driver side. The shiny part is the rear most header bolt, which snapped flush with the surface of the cylinder head. This was a bolt that I had snapped earlier when the header was still in place. 3/8" of threaded shaft was still there, and a good weld was made to affix a nut. I think I got an eighth of a turn with the impact driver, when the shaft snapped. The only saving grace is that this is the most easily accessed bolt position, and I am sure I can drill this bolt. I will first drill a quarter inch hole, and then try the EZ out. My welder friend suggests I try to drill out the center of that 3/8" bolt and then pick out the remaining threads. I think that will be my backup plan. I have been putting "PB Blaster" penetrating oil on this bolt for weeks. I'll drill it, and when it is time to try the EZ out, I'll first heat up the area with a propane torch. Hopefully, I can get this thing out. Look at the side of that engine. That needs cleaning, and a good coat of primer, and a nice coat or two of engine enamel. I talked myself out of attempting to replace the motor mount while I was here. Matt 1987 Barth 27' P32 Chassis Former State Police Command Post Chevrolet 454 Weiand Manifold, Crane Cam, Gibson Exhaust  | |||
|
 3/09 3/09 |
Hey Matt, you should try using SeaFoam Deep Creep and a reverse cutting drill bit for that header bolt. Spray it on wait about 10 minutes heat the bolt up with a torch spay it again, than watch it back out when that left handed drill bit bites. Once I discovered Deep Creep I never had to use anything else and it hasn't failed me yet. Three Times A Charm 88 30' Regal John Deere Hot Rod Lincoln 511 Cubic Inches 8712-3499-30J-A | |||
|
 |
Dave R! Thank you for this advice! Deep Creep has some great properties to loosen up the metal. In this case, the reverse 1/4" didn't start the bolt out. I then tried an EZ out. No luck, and I was in fear of busting the EZ out in the hole that was drilled. And also let me tell you a very important idea with the drilling. I had a 3/8-16 threaded rod about 18" long, leftover from the black water tank project a decade ago. I put that in the adjacent manifold hole and used that as a guide to judge how straight I was drilling. I was also very careful to put a center punch mark exactly in the center of the broken bolt. I took off a little more material with a 17/64" bit. EZ out did not budge the old bolt. I thought maybe a 9/32" bit would allow for a bit more removal of material, and that the "tube of the old bolt" would flex more. I used the EZ out, and no luck. I am using propane as well to go through some cycles of expanding the metal a little. I also used more of the Deep Creep. I was careful to look down the hole to see if I was impacting the threads. Nope! I then used the 5/16" drill bit. I like titanium bits! With this, I could see a "hint" of the threads coming through. Now it was time for a center punch and a masons hammer to start chipping away. I was able to get some larger fragments out with needle nose pliers. I kept working the propane heat on this too, thinking the bolt metal might weaken. I soaked it again with Deep Creep last night. Today, I was able to get the rest of the fragments out with a few more taps from the hammer on the center punch. I really can't believe I got this done. There is still a fragment that I ended up pushing to the bottom of the hole, more than an inch in, beyond where the header bolts will go. There seems to be something else going on with the threads of the cylinder head. I ran a fresh bolt in the hole and it was very tight. I'll try to run a tap in the hole and see if that helps. They don't look like they were cross threaded. I am so relieved by this. Having to yank the head was not something I was looking forward to. The picture shows the largest remnants of the bolt that remain, along with one that survived. I need to get longer bolts, so I will exchange those ARP stainless bolts. 1987 Barth 27' P32 Chassis Former State Police Command Post Chevrolet 454 Weiand Manifold, Crane Cam, Gibson Exhaust | |||
|
 3/23 3/23 |
Matt, patients and good workmanship payoff!! Nice work!! 1971 24 ft Barth Continental P30 chassis 350 engine | |||
|
 3/09 3/09 |
Nice work, Matt, I'm glad you didn't have to remove the head. That would of been a real can of worms. Three Times A Charm 88 30' Regal John Deere Hot Rod Lincoln 511 Cubic Inches 8712-3499-30J-A | |||
|
 |
Guys, you aren't going to believe what I found. But first, I wanted to put on the AIR pump tubes, because this is something that was going to challenge me. And yes, it sure did. I needed the Seafoam and torches to get the AIR pump fittings loose from the header. I learned not to burn off all the oil, but to heat things up and with pipe wrenches and pipes over the wrench handles, got it off. I found one of them had been cross threaded at one time, so I had to clean those threads up as well. There is a metric drain plug for Dodge truck oil pans, that matches these threads so I used that to help clean things up. I was so happy to get the parts together, and then to try to position the header on the head. And that is when I found: THE BOLT HOLES ON THE HEADER DO NOT LINE UP WITH THE BOLT HOLES ON THE CYLINDER HEAD. 0.125" off center at the end bolt hole positions. That probably explains why so many problems were had getting the bolts out. There were lateral stresses on the bolts that limited movement. I verified the alignment issue with 2 brands of exhaust manifold gaskets as well. I am guessing that when the header was installed by the truck shop I had install it, the mechanic found a way to pry the header enough to get the bolts started and then drove them home with a power tool. That is a good solution if you never have to take it off again. The picture shows my drilling process, I mentioned a few notes back. Matt | |||
|
| Powered by Social Strata | Page 1 2 3 |
| Please Wait. Your request is being processed... |
|
This website is dedicated to the Barth Custom Coach, their owners and those who admire this American made, quality crafted, motor coach.
We are committed to the history, preservation and restoration of the Barth Custom Coach.
We are committed to the history, preservation and restoration of the Barth Custom Coach.

