Go to...  | Start A New Topic  | Search  | Notify  | Tools  | Reply To This Topic  |  |
 |
I don't have to worry about saying "I have nothing to do". I'm going to replace the intake manifold and use this opportunity to also install a new camshaft. And since the water pump is coming off, a new one is going on. Because I have gone through 3 of the aluminum "7N4" AC compressor brackets, I am also going to make measurements to see if I can get a steel worker to laser cut some 3/16" plate, and with spacers, come up with a reliable solution. The guys in the Airstream forum also hate bracket 7045871. The rear support bracket seems to be missing in many cases. The bracket is a casting and depends upon "flatness" of the mounting surface. One of the mount points is on the water pump, and I wonder if manufacturing variances in that unit cause problems in the bracket. I ordered a carb spacer because the intake manifold center divider comes flush to the carburetor mount point. There seems to be empirical tests to show that having a gap here helps low end torque. The stock manifold has an interesting steel port to allow for some degree of pressure balance in this position. If I don't go with the 1" aluminum spacer I might just run a 0.25" thick gasket spacer. Milodon makes a high volume thermostat. I need that. This list is specific to a 1986 454 but might prove useful to others. List of large parts * Weiand 8122WND Intake Manifold, Street Warrior, Dual Plane, Aluminum, Square/Spread Bore, Chevy, Big Block, Peanut Port * Crane 10304 Camshaft, Hydraulic Flat Tappet, Advertised Duration 266/266, Lift .499/.499, Chevy, Big Block * Edelbrock 7809 Timing Chain and Gear Set, Performer-Link, Double Roller, Iron/Steel Sprockets, Chevy, Big Block, Set * Those first 3 are all "Made in USA". It gives me a feeling of confidence. * Elgin Hydraulic Flat Valve Lifters HL-1817S * GMB-130-1320P - Water Pump, Replacement, High Volume, Chevy 454 * Dayco 71429 - Dayco Molded Radiator Hose * Continental Elite 61569 Radiator Coolant Hose Lower * TRW 26004 Coolant Water Outlet (small part but large in impact - cross references to GM 338117 from 1963 I-6 engine, needed because the stock 14087436 water neck will mount at a different rotation on the new manifold, you can get this in iron and aluminum, I chose NOS iron on Ebay) List of small parts * Crane Cams 99168-1 - Crane Cam Locking Plate and Bolt Kits * Fel-Pro TCS45272 - Fel-Pro Timing Cover Gaskets * Fel-Pro 70194 - Fel-Pro Distributor Base Gaskets * SCE Gaskets 11306 - SCE Fuel Pump Gaskets * Mr. Gasket 5827 - Mr. Gasket Ultra-Seal Intake Manifold Gaskets, Composite, Oval, 2.16 in. x 1.85 in. Port, .060 in. Thick, Chevy, 396-454, Set * Mr. Gasket 954G - Mr. Gasket Hex Head and Socket Head Intake Manifold Bolt Kits * Right Stuff Detailing TPC8654 - Right Stuff Detailing Fuel Pump to Carburetor Lines, Pump to Carburetor, Steel, Chevy, GMC, Each * Standard Motor Products PVS80 - Standard Motor Ported Vacuum Switch * Standard Motor Products PVS102 Ported Vacuum Switch * Fel-Pro 17843 - Fel-Pro Marine Carburetor Mounting Type, Spread Bore, 4-Barrel, Open Center, 0.250 in. Thick, Paper * Fel-Pro 1605 - Fel-Pro Performance Fel-CoPrene Valve Cover Gaskets * Trans-Dapt Performance Products 2109 - Carburetor Spacer, Aluminum, 1 in. Thick, Open, Spread Bore * Four Seasons 84757 - Four Seasons Heater Fittings, Plastic, Y Type, Hose Barb, 5/8 inch, 3/4 in. Legs * Ideal Tridon stainless steel hose clamps, various sizes * Victor Reinz OS30931X Engine Oil Pan Gasket Set 65-90 Chevrolet 396 402 427 454 * Woodruff Key * MIL-16400 - Milodon High-Flow Thermostat, 160F * rubber vacuum lines, various sizes * steel line to replace the line between the manifold and transmission * 3 hose split exhaust flange, size TBD List of chemicals * Mr. Gasket 78080G - Mr. Gasket RTV Sealant * Permatex 56521 - Permatex High Performance Thread Sealant * Permatex 81724 - Permatex Ultra Blue RTV Silicone * Crane Cams 99008-1 - Crane Engine Assembly Lubes * Loctite 37418 - Loctite Threadlocker 242 Medium Strength * EAR-D024ERL Earls Thread Sealant, Instant * 99003-1 - Crane Super Lube Break-In Concentrate List of tools * SUM-900134 Camshaft Installation Handle, Hex Design, Bolts Included, Chevy, V8/90 Degree V6 * SDM-PCE397-1002 - Speedmaster Crankshaft Sockets * I've got a harmonic balancer puller * I'll need a crankshaft gear puller and installer 1987 Barth 27' P32 Chassis Former State Police Command Post Chevrolet 454 Weiand Manifold, Crane Cam, Gibson Exhaust | ||
|
 |
The work in progress: the radiator and all the belt driven accessories are off the engine. The intake manifold is off. The old timing chain and camshaft have been replaced. Because of the studs on the intake manifold which mount the front brackets, it was necessary to take the brackets off. With the front parts off the engine, it seemed prudent to replace the water pump and fuel pump at this time. "might as well do a camshaft too!". To remove the timing cover, most bolts need to be remove from the oil pan. To remove the rear bolts, to which access is impeded by the oil cooler pipes, it was necessary to remove the oil cooler mount. I sometimes ask, "Did I sign up for this?" The intake manifold will be bolted on this weekend. The picture is my version of the parts counter. Happy Motoring! Matt 1987 Barth 27' P32 Chassis Former State Police Command Post Chevrolet 454 Weiand Manifold, Crane Cam, Gibson Exhaust 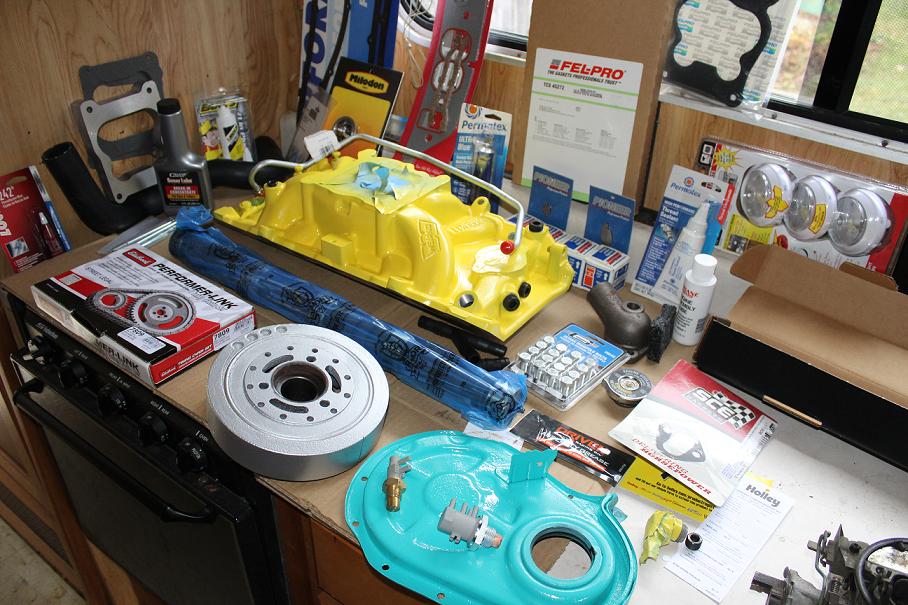 | |||
|
 |
The two manifolds, old and new. Please note the rust hole on the driver side of the carburetor mount area. That got this job going.... Matt 1987 Barth 27' P32 Chassis Former State Police Command Post Chevrolet 454 Weiand Manifold, Crane Cam, Gibson Exhaust 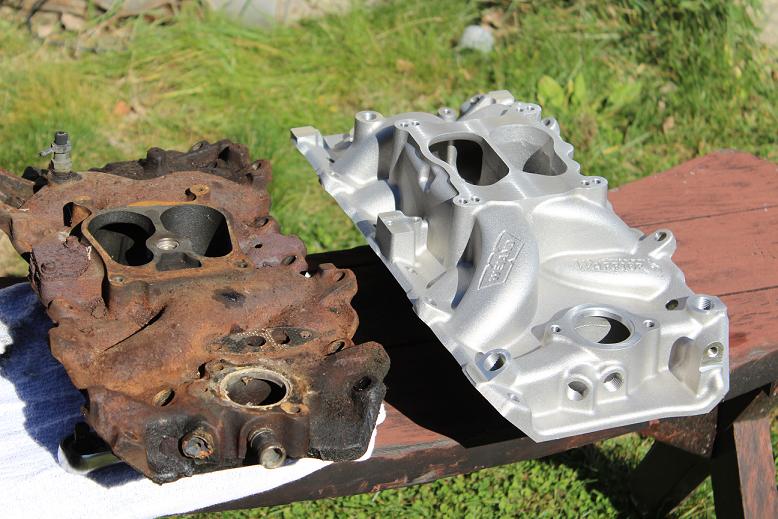 | |||
|
 |
There was lots of play in the timing chain. Though there is under 40K miles on it, probably the original design specifications did not call on the plastic gears having to remain dimensionally stable for 33 years. Look at the amount of deflection in the chain. No wonder the look under a timing light looked so erratic at idle. I haven't found a suitable serpentine belt system yet. I would have expected to find some at the junkyards, but apparently old engine parts get shipped overseas quickly, to be recast as something else. I still like the idea of having two belts going to the hydroboost pump, and I have never had problems with those belts or those associated brackets. I will probably be sticking with the stock belt setup. I will probably have a machinist cut some steel plate for me to make a replacement bracket for the stock Sanden AC compressor mount. Though I will get a price check on getting an iron version of the bracket cast at a nearby foundry. I have been finding parts at Summit, Rock Auto, and ebay. www.gmpartswiki.com is a great resource to learn about too. Happy Thanksgiving! Matt 1987 Barth 27' P32 Chassis Former State Police Command Post Chevrolet 454 Weiand Manifold, Crane Cam, Gibson Exhaust 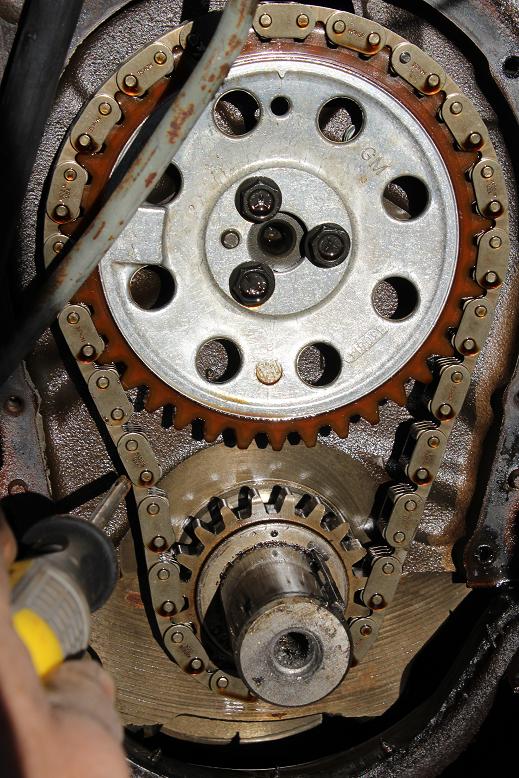 | |||
|
Official Barth Junkie |
Actually, as timng chains go, that one looks pretty good. Still has teeth on the plastic gear and not that much slop. (I have seen them so loose they rub on the inside of the cases!) For sure replace it all! You will have years of service ahead of you. You're giving me flashbacks on my 454 jobs... 9708-M0037-37MM-01 "98" Monarch 37 Spartan MM, 6 spd Allison Cummins 8.3 325+ hp | |||
|
 |
Steve VW, your stories of your 454 jobs have inspired me! That Edelbrock timing chain I installed seemed to fit perfectly! What I've found works great, and I found this by accident, was that in November the sun is low, and I had parked the Barth facing the sun of the morning. It is a great way to illuminate the engine compartment. I wished I'd parked the front wheels on some 2 inch thick paving stones; I hadn't thought about having underside access when doing an intake manifold job, but just a little more clearance would have helped. Matt 1987 Barth 27' P32 Chassis Former State Police Command Post Chevrolet 454 Weiand Manifold, Crane Cam, Gibson Exhaust | |||
|
 |
I am still at it. I had a bit of a panic when I saw that the belts did not align right between the water pump and the crank. I was scared of having to drive the harmonic balancer back further, and risk stripping the threads on the crank. I looked at many online pictures of how the 454 balancer fits relative to the timing cover and timing tabs. I decided I did that installation right, after looking at the belt alignment between the crank and the power steering/brake pulley. Those are "right on", and I am using the correct 3/8" width belts that come from Gates, out of their industrial line. No more 10 or 11mm belts for me. But this gives some idea about why our 1980s P30 rigs eat belts, and the 7N4 aluminum alternator bracket. The alignment is off when replacement water pumps do not exactly match the dimensions of what the GM water pump designer wanted. In my case, I will put some shims between the water pump and the water pump pulley to get the offset right. I also found on one of the air pumps, that the metric mount threads were damaged by a 3/8-18 bolt. So that would cause looseness on the serpentine belt. I'll probably replace the pump. I've got some steel to make a replacement AC compressor bracket. I'll make some notes about that separately. In our file here, someone mentioned it was smart to remove the "second doghouse cover". I did that, it really helps with getting the work done. It looked like it was held in with 3 screws and some silicone sealant. My air cleaner sits higher now, because of the added manifold height, and the snout interferes with the oil fill tube. I'll have to figure out a long term solution for this issue. I will probably try to start it up soon. The radiator is not in place yet, so I'll probably limit the "run" to 30 seconds. I'm having fun! Matt 1987 Barth 27' P32 Chassis Former State Police Command Post Chevrolet 454 Weiand Manifold, Crane Cam, Gibson Exhaust | |||
|
 3/23 3/23 |
Well Matt again your patience and attention to detail pays off. Then there is me!!! I was blowing a belt every 50 to 75 miles, had one terrible over heat when I failed to notice it was gone!! So I have taken off the AIR pumps worthless gas guzzlers, in IMHO. Replaced the v-belts with a set of 3 Gilmer pullies for a cogged drive belt they are almost 2 inches wide, however the belt running to power steering pump is still a v-belt, the Gilmer crank shaft pully has a V cut in it for this device. The v-belt stretches a lot for the first 1000 miles or so, makes noise so I know when to tighten it. Only one pully aligns the belt so the other Gilmer pullies are just extra wide, belt goes where it works best. Have yet to take an extended trip, so no feed back yet. I should say the Gilmer set up does make a bit of a whine, like a super charger if the belt is to tight. 1971 24 ft Barth Continental P30 chassis 350 engine | |||
|
 |
Here's part of the job that I didn't expect. The Weiand manifold I chose has a boss at the front, in order to work with the serpentine belt hardware of more recent versions of the 454. It interferes with the support bracket for the AIR pump. I never thought I would have to think about using a sawzall as part of an engine job. I'm in Massachusetts and though my machine is presently exempted from emissions concerns because of the age, I also would not be surprised for the state government to change that as well, and require all original hardware be present. So I am keeping the "smog hardware"... Part of my "attentiveness" to the "belts issues and alignment" is that I've had a few episodes of having to repair things in the middle of a trip and I've had three of the AC brackets break. That's not how I want to roll!!! Matt 1987 Barth 27' P32 Chassis Former State Police Command Post Chevrolet 454 Weiand Manifold, Crane Cam, Gibson Exhaust 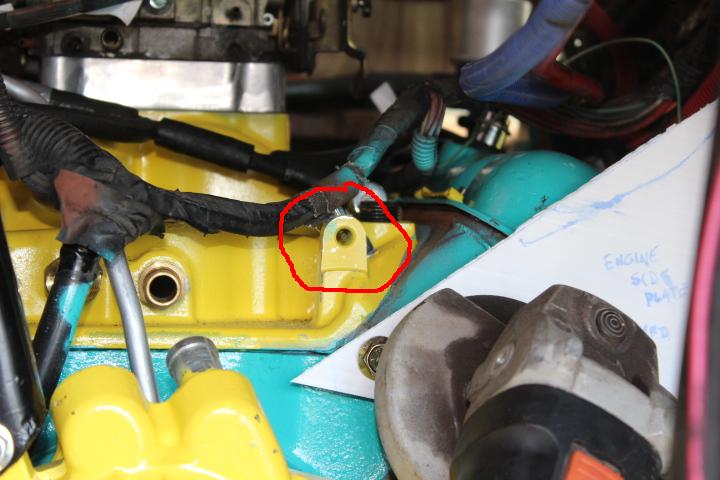 | |||
|
 3/23 3/23 |
Matt you could put those smog parts on the shelf, keep in case the State law changes. Save your self 10-15% in fuel costs. I have looked at a new aluminum manifold too. Does the one you have eliminate the cross over heater circuit and the EGR circuit. I would like to get rid of both of those too. Already taken the EGR off and it is in the bin too. It also looks like a low rise, like original. There is a 1971 Corvette one on Ebay, they want a lot of money for it but all that weird stuff is not present. "old School" 1971 24 ft Barth Continental P30 chassis 350 engine | |||
|
I was gonna replace my intake manifold with one from Edelbrock but decided to paint it instead. That iron manifold has lasted 34 years. Obviously they're indestructible. Besides, I heard bad things about aluminum intake manifolds, they're more prone to damage and they start to corrode and look ugly, same as everything else under the hood. | ||||
|
unpainted and ugly | ||||
|
 3/23 3/23 |
Jumanjii Nice, did improve the look, why did you take it off and was it a big job? I am fixing to do the same to look at the cam and lifters, just curious!! Thanks 1971 24 ft Barth Continental P30 chassis 350 engine | |||
|
 |
We should talk! I wish I painted mine up ten years ago.... That is a hole rusted through the exhaust cavity in the intake manifold, used to warm up the carburetor. After what has happened to mine, I am obsessive about surface preparation, and using good primer, and then the paint. I like that red! Matt 1987 Barth 27' P32 Chassis Former State Police Command Post Chevrolet 454 Weiand Manifold, Crane Cam, Gibson Exhaust | |||
|
 |
Today was big happy day for me. I have been picking at the project, and realizing it is more of a restoration than just a repair. I looped back the tranny lines, put the oil cooler back on the lines, fixed the broken wire on the oil pressure sender unit, added oil through the distributor hole, primed the oil system with a power drill and the priming rod I've had since the 1980s, set the distributor in place to the #1 firing position, and hooked up the plug wires. I carefully poured a little bit of gasoline out of a "Franks Hot Sauce" bottle in to the breather vent of the carburetor. All vacuum ports are plugged right now. I turned the key and nothing happened. That fix is the point of another story, but I fixed an electrical issue, and tuned the distributor by ear. Crane Cams says to run at 3000 RPM for the first 30 minutes, but without a cooling system, I limited my run to about 15 seconds. Still, it was quite enjoyable to see that all work out. I think I will recheck the adjustment on all the valves and get the radiator in place. In my picture here, you can see my fabricated Sanden AC compressor bracket, still a work in progress. I just realized that the belt specified for running the Sanden is 3/8", and the pulleys on the crank and water pump support this. But somewhere along the way, my Sanden compressor found itself wearing a pulley wanting a 1/2" belt. So my focus on the bracket is lessened for now. Happy Motoring! Matt 1987 Barth 27' P32 Chassis Former State Police Command Post Chevrolet 454 Weiand Manifold, Crane Cam, Gibson Exhaust | |||
|
| Powered by Social Strata | Page 1 2 3 |
| Please Wait. Your request is being processed... |
|
This website is dedicated to the Barth Custom Coach, their owners and those who admire this American made, quality crafted, motor coach.
We are committed to the history, preservation and restoration of the Barth Custom Coach.
We are committed to the history, preservation and restoration of the Barth Custom Coach.

