Go to...  | Start A New Topic  | Search  | Notify  | Tools  | Reply To This Topic  |  |
| First Month Member |
I recently helped a camping neighbor who had the red brake light illuminated on his instrument panel, along with really poor braking. He was stuck over a weekend and couldn't get anyone to come out and work on his brakes. They all told him not to drive it, but none would work on motor home brakes. He was rightly afraid to drive it. The heck of it is, the P30 is just a big pickup, chassis-wise. Perhaps no one wanted to come out because our campsites on the state beach had water so deep that we had ducks swimming under our RVs. I felt like we were living in a houseboat. Many folks think the red light means either the parking brake is applied or the reservoir is low. The first part is true. If the light illuminates and it is not the parking brake, it is telling you that one half of the reservoir is empty, not low. You have lost both left and right brakes on one axle...... Serious Stuff. The combination valve has a switch that illuminates when either the front or rear brakes are out of fluid. When one section of the reservoir runs empty, the valve senses an imbalance in fluid movement, and a spool goes all the way to one side of the valve, making a ground and illuminating that red light. That is not a low fluid warning, it means you have lost half of your braking ability. It would be foolish to do any but the most careful driving on level ground in light traffic. The combination valve is bolted to the smaller cross member under the front of the engine. It is hard to see without a mirror, but a blind man can find it by following the brake lines by hand. If the light goes out when the connector is pulled off, the fluid is probably low in one chamber. Operation of the combination valve can be checked by opening both front bleeders and pressing the pedal hard. The light should illuminate. This sounds like overkill, but it is a safety system that needs to be checked now and then, along with a fluid change. Refilling the low compartment of the reservoir and bleeding the brakes on the appropriate axle should extinguish the red light on the first firm pedal depression, but if that doesn't happen, there is a rain dance that will do it. Anyway, his front fluid had gone empty with no evidence of leakage anywhere, so I told him to check it often for a while. Refilling and bleeding fixed everything. . 84 30T PeeThirty-Something, 502 powered | ||
|
| First Month Member |
Checking your P30 brake fluid. It's no fun, but losing half your brakes can be fatal. The master cylinder is under the driver's right foot, and can be accessed from inside or outside. Access from outside is best done by cranking the steering full right and removing the back bolts of the sheet metal splash shield in the wheel well. It can be tied out of the way with baling wire. Either way, smear a little brake lube where the two bails engage the cover, and pry them loose. A short screwdriver or old-fashioned brake adjuster tool works best. Lift the cap off gently to avoid anything falling in. I like to do it from inside, as it allows me to push the pedal and watch and refill the reservoir. . A funnel with a hose fills the reservoir neatly. A headlamp helps. A small bright flashlight held in your mouth aims better, but it is not good to hold a flashlight in your mouth if you have been handling brake fluid. If you don't change fluid yearly, use a turkey baster to suck the old fluid out of the reservoir and replace it with new. After the old fluid is out of the reservoir, stuff it with paper towels. Clean the rim of the reservoir of any residue and remove the paper towels. The paper towels will catch anything that could fall in the reservoir and clog a compensating port and cook your brakes. It happens. This reservoir purge is not as good as complete fluid replacement, but it will lower the moisture content of the fluid, which is a major cause of brake loss in mountains. It will also partly forestall corrosion pitting of caliper pistons. Before reinstalling the lid, clean it really well and smear the sealing surface of the reservoir with a little brake lube. I use Sil Glyde from Autozone, but there are others that are probably just as good. It just needs to be compatible with the fluid and the rubber. This will prevent corrosion. After the lid is on and the bails are in position, smear their engagement notches with a brake lube. . 84 30T PeeThirty-Something, 502 powered | |||
|
| First Month Member |
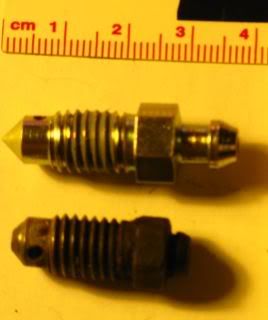
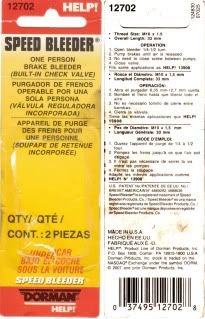
P30 Bleeding and Speed Bleeder Info (More stuff I found in my notes) Whenever I do my yearly brake fluid color change, I tell myself that I should have ordered speed bleeders, to make things a little easier. This despite the fact that Susan and I are really a good team at brake bleeding. Even including the tag brakes. Every time I looked into buying speed bleeders, I got different and conflicting information from usually reliable sources. Even the manufacturer got it wrong. On my most recent flushing, I finally took one bleeder out and measured the threads and plunge depth to be sure. I found that mine were M10 X 1.5, with a plunge depth of 20mm. Plunge depth is the measurement from the pointy end to the underside of the hex. The picture may help here. This, of course, will vary a little with the sharpness or flatness of the pointy end. OEM takes a 10mm wrench.  The lower one is OEM. This is not to say that mine is like everyone else's, but it is possible they only used one on the P30 disk calipers. Sellers will list them by overall length, as well as thread size and pitch, but that depends on the length of the hose nipple. For example, the OEM bleeder has a very short hose nipple, which makes the overall length of little use when compared to a nipple of another manufacturer. After removing and measuring mine, I ended up buying Dorman/HELP 12702, http://www.dormanproducts.com/...e/008-017_BFinal.pdf which matched up and fit perfectly. The hex takes a 7/16 wrench, which is a little strange for a metric threaded part. At least it isn't Whitworth or something. I would have liked to buy Earl's, as I like their design better, but they lack the required plunge depth in M10 X 1.5. Anyway, speed bleeders allow me to bleed or replace the front fluid by myself. I kneel behind the engine and press the pedal with my left hand while I watch the clear tube down on the ground for the color change. For the rears, Susan watches and calls out the color change.  NAPA crosses the number to http://www.napaonline.com/Sear...K_6751566_0293958706. The NAPA page says it has M10 X 1.25 threads. I believe it is a mistake, but I have not verified this. Napa's information is not always accurate, and often conflicts with itself. Pep Boys stocks it under the Dorman number. The HELP number got me a blank stare, so try both numbers. $10 per pair. They take a 7/16 wrench, despite the metric threads. At least it wasn't Whitworth. Rockauto http://www.rockauto.com/catalog/raframecatalog.php also sells it P30 Bleeding Hints. Suck the old fluid out of each half of the reservoir, and stuff it with paper towels. Clean the rim of the reservoir of any residue and remove the paper towels. Fill both reservoirs and have at it. With a speed bleeder, I bleed both fronts simultaneously, using a jar for each. With the right length hoses, I can place the jars where they can be seen from inside. Just behind the left tire, and a little inside. I kneel behind the engine and push the pedal with my left hand while I watch the reservoir and the jars, refilling as needed. For the rears, Susan watches the hoses and lets me know when the clean color change occurs. I use long clear vinyl hoses to get the jars out where Susan can see it easily. A small diameter hose will avoid wasting too much fluid. It is good not to push too hard or rapidly on the pedal, as it could activate the switch in the combination valve. I use a German fluid that comes in blue and gold. Some alphabet soup name. ATE, maybe. I alternate colors each year so I can easily tell when the new fluid is in place. It has very good numbers, too. Some racers use it. I think Porsche and Horch dealers sell it. Brake fluid selection has been well-discussed here earlier. It comes in metal cans, so will not deteriorate in storage from moisture absorption through the plastic container. If you dump marbles into a partially-used can, the level can be raised to the neck to exclude any moist air and it can be recapped and stored. I have verified this with my electronic moisture tester. Before reinstalling the lid, clean it really well and smear the sealing surface with a brake lube. I use Sil Glyde from Autozone, but there are others that are probably just as good. It just needs to be compatible with the fluid and the rubber Different sources will tell you different things on fluid replacement frequency, but my own rule is yearly for those who go down scary mountains, and every two years for those who don't. At the minimum, use a tester or test strip when you check your fluid level. And, mountains or not, fresh fluid will cut down on corrosion in calipers, where water collects. . 84 30T PeeThirty-Something, 502 powered | |||
|
| Powered by Social Strata |
| Please Wait. Your request is being processed... |
|
This website is dedicated to the Barth Custom Coach, their owners and those who admire this American made, quality crafted, motor coach.
We are committed to the history, preservation and restoration of the Barth Custom Coach.
We are committed to the history, preservation and restoration of the Barth Custom Coach.

