Go to...  | Start A New Topic  | Search  | Notify  | Tools  | Reply To This Topic  |  |
 3/11 3/11 |
I just finished the dish conversion so that my new flat panel tv can receive HD programming. I thought some of you might want to see how it was done. first a few details: The current satellite dishes available for rv's cannot receive HDTV. The HD programming uses 5 satellites (Direct TV) and has 5 LNB's mounted on a dish that is a parabola about 2 times the size of the circular 18 inch that came with my crank up Winegard dish system. This is the one installed at the factory in 1993. It has one LNB and folds flat. I wanted to make sure the installation worked like the old one - folds and cranks up so I dropped cable and subscribed to Direct TV HD. The technician arrived and setup the dish on my roof, installed the cabling and receiver (Dish H20-600) and then gave me a second dish set up. I think they get these from customers who move or cancel so they are surplus, but mine was brand new in the box. Just so we are clear - Trac Vision, King Dome and Winegard cannot receive HD as they presently are configured. Check before you buy a $1600 dome system. 1. I removed the existing 18" dish and LNB by removing the coax from the LNB head and the two C clip bolts at the point where the arm folds. Leave the rotating mount in place on the roof - you do not need to remove it. This is a good time to check for poor sealants and moutning screws. Repair as necessary. 2. I then placed the new dish on the support bracket and found it was not going to line up with the holes. Place the dish in the center of the support leaving about 1/2" clearance at the bottom. Drill holes and then file to create carriage bolt square patterns. Install the bolts and mount the dish. See picture 1. 3. Carefully measure the distance from the new LNB to the face of the center of the new dish (You can do this when you assemble the dish r climb your roof and check the one the technician installed.) The distance should be 19.75 inches from the back edge of the large LNB that is centered on the dish (This is the triple LNB for HDTV). This is the focal distance you must replicate by cutting and fabricating the new arm to fit on the old folding pivot point. You will be removing the existing arm because it will be too short. But don't discard as you will have to use it for a pattern to drill mounting holes, trim "ears" for the folding stop point and mount the spring that unfolds the LNB when you raise the dish. In picture 2 you can see the distance from the end of the arm (where the LNB fits into it) to the top edge is 14-1/8". If you carefully trim the end of the arm to 16 inches with a saw you will have a blank that will then be filed to match the ears , holes and cut out that matches the original Winegard. It is best to slowly trim and fit so that you can find the exact length that results in the LNB focusing on the center of the dish, 24 degrees offset from the centerline and 19.75 +/- .1 inches from the face aiming point. You could use wood to make atemplate while the new dish is still assembled so you get it right the first time. Don't be intimidated by this description - it is not that hard if you take your time and measure at least twice. 4. When this is finished you will mount the dish and LNB on the coach, attach the coax and raise it so the face of the new dish is vertical. With the new arm pivoting in the front hole (leave the spring out for the moment) mark the location of the ears where they will hit the second pin. If you file away a small amount at a time you will notice the arm pivots downward with each filing. The place to stop is when the distance is 19.75 inches (+/- .1) from the face. The ears are the fine tuning to be sure the focal point of the LNB is correct. Assuming you have assembled and filed this as described you should now remove the arm, install the spring through the top pin (make sure the notch is added or the spring will be broken when it folds down), and install the C clips. Add cable ties to hold the coax and any elevation sensor cables (Winegard installed their MAGIC Sensor on most the crank ups)and clean up the installation. When you go below and want to sight your dish there is one more thing to be careful about. The satellite aiming direction give three points to adjust, elevation, azimuth and tilt. You will ignore the tilt because you simly can't tilt the dish when you are mobil. This could affect some HD programming rfeception becaue the axis of the dish may not be paralle to the line of the three satellites Direct TV uses (110, 119, 91). IN my area tilt is stated as 79 degrees which is 11 degrees right of vertical. This did not cause me a problem with my reception. Azimuth (rotation) will be approximately as staed in the guides or on your setup screen. Elevation will be about 7 degrees lower than stated - mine said sat 110 was 52.8 degrees but it centered at 47 degrees. This is because of the parabolic shape of the dish as compared with the circular old dish. Just use the satellite finder and compass and fine tune inside until you get the maximum gain. For the finished installation see picture 3. This job took about five hours and required a few new bolts and labor, but now I have a crank up HDTV dish and it folds nicely for traveling. If you have problems with any of the pictures send me an e-mail and I'll send them to you off line. 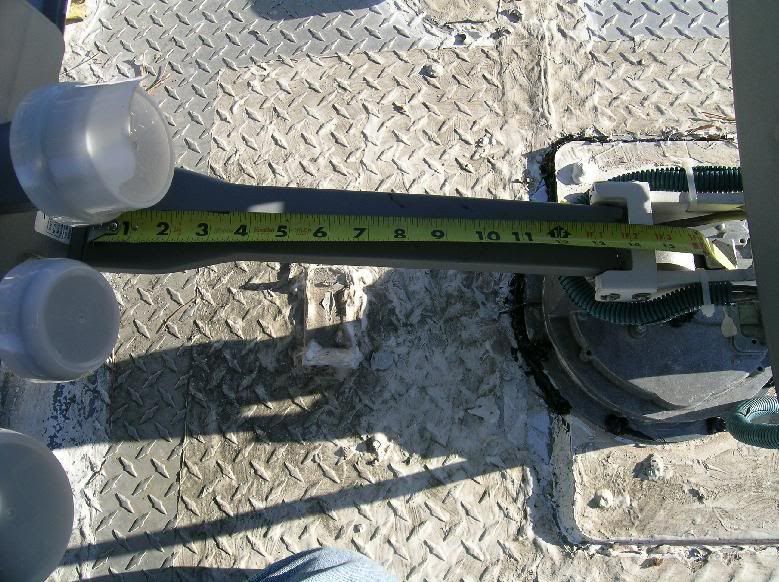 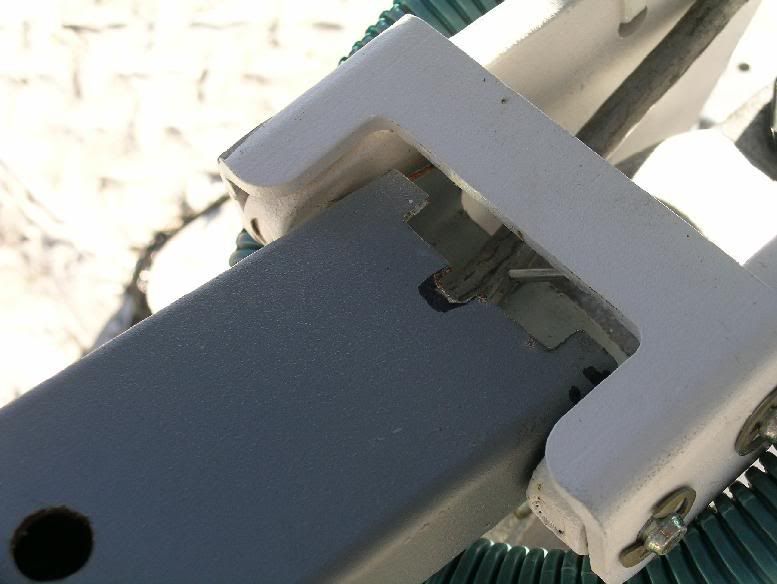 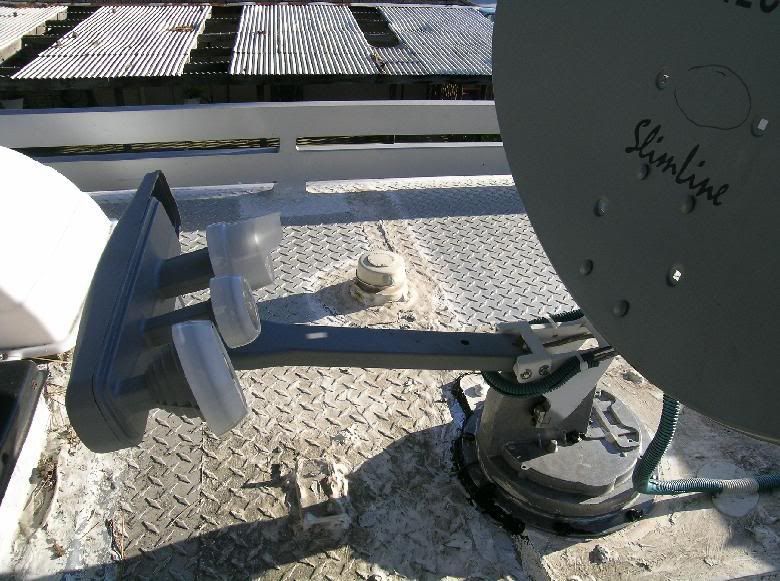 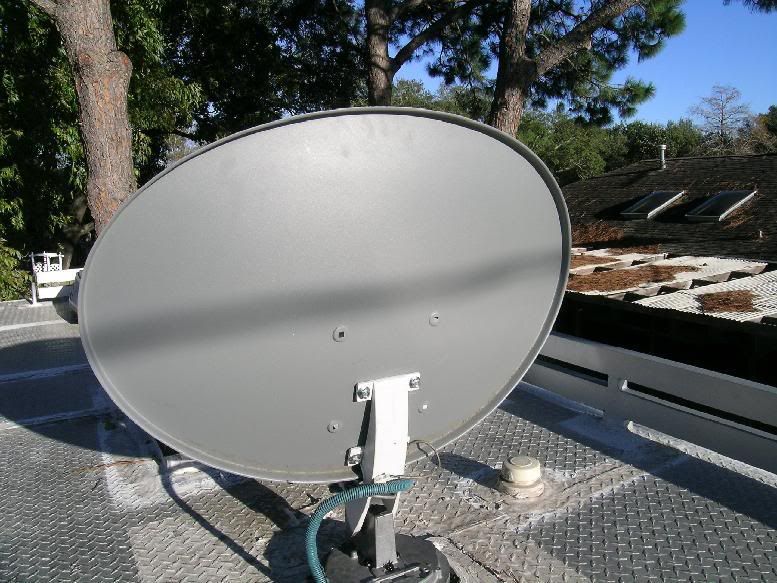 1993 32' Regency Wide Body, 4 speed Allison Trans, Front Entry door, Diamond Plate aluminum roof & 1981 Euro 22' w Chevy 350 engine and TH 400 tranny | ||
|
 |
Don,t you just love pine needles. Nice work. JKB 88 28' Regal 454 Blue/Silver metalflake | |||
|
 3/11 3/11 |
Yep- I figure with about two seasons the tar will cover the roof and I won't have any leaks. Thankfully the Texas sun bakes the tar and it crystallizes and then I can wash it off. 1993 32' Regency Wide Body, 4 speed Allison Trans, Front Entry door, Diamond Plate aluminum roof & 1981 Euro 22' w Chevy 350 engine and TH 400 tranny | |||
|
| Powered by Social Strata |
| Please Wait. Your request is being processed... |
|
This website is dedicated to the Barth Custom Coach, their owners and those who admire this American made, quality crafted, motor coach.
We are committed to the history, preservation and restoration of the Barth Custom Coach.
We are committed to the history, preservation and restoration of the Barth Custom Coach.