Go to...  | Start A New Topic  | Search  | Notify  | Tools  | Reply To This Topic  |  |
Hello All, I've taken a look around with search tool and manual exploration, perhaps missing what I seek so take it easy on the new guy if I should have already found it. Below is a photo from today. I took down the vent shroud and a few of the ceiling strips. Found that the headliner looks to be glued to an aluminum panel. Question: To reattach the headliner, does anyone know if I can (easily) remove the front cabinets and front part of rear cabinets to bring down the entire ceiling panel for re-construction using spray adhesive and the original headliner? Thanks for any advice. 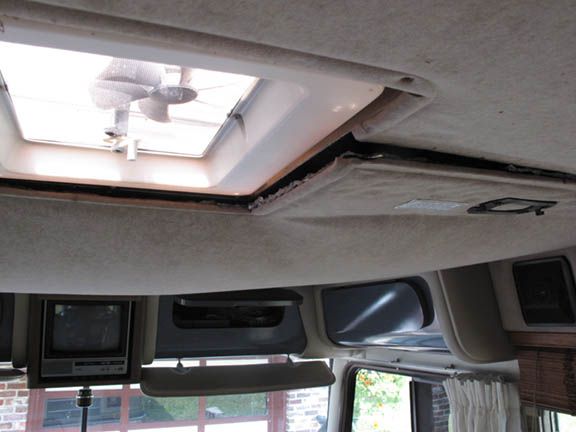 1989 22' Regal 454 | |||
|
 7/17 7/17 |
You will find that Barths are put together with screws not nails. You should be able to remove all the uppers then remove the panel. Others have done it. Take lots of photos. Doorman 1986 31' Regal -1976 Class C 454/T400 P30 -350/T400 G30 twin cntr beds - 21' rear bath | |||
|
You will also find out that those screws take a square bit, not phillips, I think they are called Thompson or someting.Usually you will need more than one size. ....and if you can figure out the angle the installer set these you will strip a lot less of them. #1 29' 1977parted out and still alive in Barths all over the USA | ||||
|
Doorman, Dick, Thanks for the advice. I have peeked around inside the cabinets, noticed the square bit screws, and even thought to myself that the installer may have used certain 'angles' originally. I am particularly concerned with wiring for the lamps at the bottom of the cabinets, believing it to be contained in the wall, since nothing is present inside the box. I've yet to dismantle the fixture, but suspect I may be able to unplug the lamps. My idea is to get the entire ceiling panel out and on horses where I could carefully strip off the fabric, scrape any goo-ified foam backing, and respray with adhesive so I could reattach the original material. More tomorrow if I give it a go. Kirk 1989 22' Regal 454 | ||||
|
Kirk, what are you doing up so late? #1 29' 1977parted out and still alive in Barths all over the USA | ||||
|
Reading and learning. I'm a night owl. I sent you a P.M. 1989 22' Regal 454 | ||||
|
 |
They are called Robertson screws and have 2 advantages over Phillips. They will stick to the end of the bit to make 'em easier to install and will NOT strip if you are using the correct size bit for your driver. You definitely need to get a good quality set of bits and the right size in a hand screwdriver if you own a Barth 'cause there are hundreds of 'em in it! Don
You will also find out that those screws take a square bit, not phillips, I think they are called Thompson or someting.Usually you will need more than one size. ....and if you can figure out the angle the installer set these you will strip a lot less of them. 1990 Regency 34' Cummins 6CTA 8.3 240hp Spartan Chassis, 4 speed Allison MT643 | |||
|
 8/10 8/10 |
...and the foam underneath the headliner fabric seems to be quite deteriorated. I won't *touch* mine, for fear of leaving deep, fingerprint impressions in the foam. I picture the foam as being a real mess under that fabric. There has got to be a better headliner material to replace the original with. I'm certain others have done this... ~Mac~ 1990 31 Foot Regency Spartan Chassis Cummins 6CTA8.3 Alison MT643, 4-speed 8905-0123-31RDS-A2 | |||
|
Glassnose Aficionado |
The bits come in size 1, 2, and 3 at the hardware store, but there are also 0 and 00 needed to get the smallest screws out, and they can be hard to find. I made my own with size 1 and a bench grinder. Check the floor of the cabinets. I think you'll find a false floor that removes easily and the wiring is under it. That's how mine are. I didn't remove my cabinets, I put up trim moldings around them after glueing the new vinyl to the ceiling. Search "ceiling". My pix should be there. Take pix to show us how you do it. Good luck. 79 Barth Classic | |||
|
Glassnose Aficionado |
After checking the search, it's under ceiling work, about 5 pages with lots of pix. 79 Barth Classic | |||
|
Much better than phillips. I had to file a standard size by hand to get to the O or OO size, not everybody handles those tiny bits. A cordless drill with an extention can be pretty handy in many cases. Good Luck! #1 29' 1977parted out and still alive in Barths all over the USA | ||||
|
Hi Dan, Yes, I saw your post and admired that work you did. I had hoped mine would be easier, but as would be expected, "While you're in there" has just raised it's ugly head and I've discovered why I had smelled "cuban cigars" after the PO ran the AC briefly for me. Rodents! I went out of my way to question the PO on this subject and he denied any sign of them. Well, now that I've peeked up under the ceiling panel and tried to run the AC (w/genny) 'cause it's so blasted hot out... all you smell are the odors from old nests. I believe I am now looking at a total ceiling removal, along with AC unit, to track down the rodent mess and get it good an clean with Lysol. I like some of the alternative ideas for the ceiling and am considering abandoning my initial desire to re-use the original fabric... although it is in nice shape 'cept for the deteriorated foam underneath. The cabinets look easy and I started to bring those down, but it's too hot. I'll go out later this eve. when it's cooler and see what trouble I can get into. 1989 22' Regal 454 | ||||
|
Glassnose Aficionado |
I have a hard time believing rodents were nesting in the ceiling itself, but they could easily nest in the AC. The fact that you smell it when running the AC backs this up. I'd pull the covers and dig as deep as possible looking for any foriegn substances. Mud dawbers and wasps enjoy the fins, nooks, and crannies. I think all the marine vinyl was about $100, so re-using the old stuff doesn't make sense to me, considering the amount of work involved. 79 Barth Classic | |||
|
 9/10 9/10 |
I ordered my square bits from here: http://www.mcfeelys.com/search/square+drive+bit Every couple months they seem to have a free shipping special. 1978 P32 w/454 s7708 2284 MC27 S-3 My dad makes me wanna Barth! | |||
|
Well, the rodent nest has been revealed. The outside looks fine... but looks are deceiving... 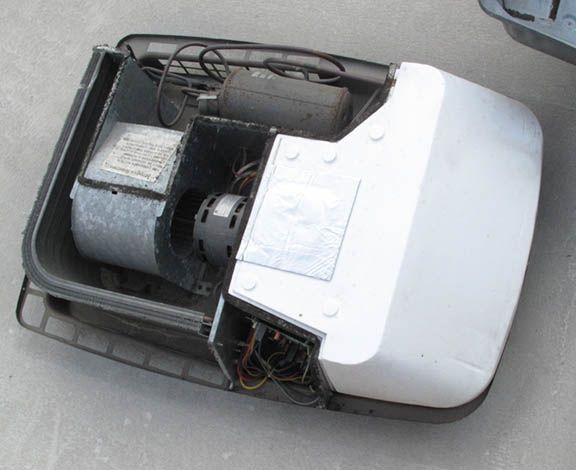 Son-of-a-%&+@# !!! 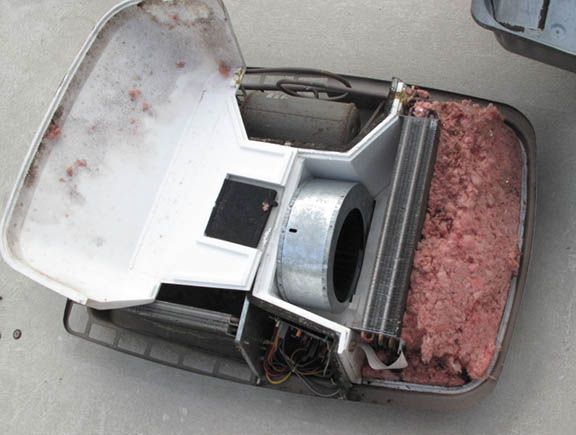 So, now I've got my respirator out, rubber gloves, and garbage bag and it ain't lookin' pretty. If I was independently wealthy, I would simply replace the unit. As it is, unless someone has one of these AC units gathering dust (non-working preferable, I just need the front styrofoam compartment) I'm going to have to figure out how to replace that insulated area as it is a complete mess underneath. I really hope this was the palace and everybody lived under one (AC) roof. 1989 22' Regal 454 | ||||
|
| Powered by Social Strata | Page 1 2 3 |
| Please Wait. Your request is being processed... |
|
This website is dedicated to the Barth Custom Coach, their owners and those who admire this American made, quality crafted, motor coach.
We are committed to the history, preservation and restoration of the Barth Custom Coach.
We are committed to the history, preservation and restoration of the Barth Custom Coach.